HomeARTWordsStudioTutorialsClassesShop

Sunday, June 29, 2008

Heirlooms, Treasures, and Keepsakes.....

Heirloom:
something that has been passed down for generations through family members
Treasure:
a concentration of riches, often one that has been considered lost or forgotten until being rediscovered.
Keepsake:
an item that reminds a person of a specific event or time.
The above definitions are how we often describe the things that have been handed down to us in our families. I am a bit more blessed than others in this area as I have become the official family member that everyone gives their stuff to. Exactly how this happened I do not know. Maybe it is because I appreciate things from the past or have expressed interest in the stories surrounding the object. A friend of mine loves to come to my house. She likes to point things out and ask me the story. She often sighs and says she wishes she had family things and stories to tell. I always tell her that she can be the one to start the traditions in her family, after all, they have to originate somewhere.

As I thought over all the things I have, I could really only come up with one true by the
definition heirloom ~ a reverse glass painting that has been in the family for well over one hundred years. It belonged to my great uncle's family and came from Pennsylvania Dutch Country. It was painted by an itinerant artist traveling through the area. Often such artists would trade their paintings for food and lodging as they traveled. This is the story I was told of how it came to be in the possession of our family.My painting and its frame were damaged in a house fire. It was a prized possession and was snatched out quickly but not before some of the paint heated up and melted off and bits of the frame edging were blackened and scorched. It was stored for years in disrepair until my great aunt dug it out of storage and put a piece of tin foil on the back, carefully cleaned the soot from the front of the glass, and refinished the wooden frame. She hung it in her den. I grew up asking to hear how the painting was saved. To entertain me, my great aunt often made up stories of the people who lived in the house in the painting and what kinds of things they did. After both she and my great uncle passed away, my mothers cousin gave her the painting to give to me. It has hung in my home ever since. I got interested in this style of painting and now have a small collection of them.Reverse glass painting is an art form that consists of applying paint to a piece of glass and then viewing the image by turning the glass over. You literally have to paint backwards, from the front of the scene details to the back, layering highlights and shading to create depth. Signed pieces are as scarce as the paintings themselves. Often the painting did not survive as they were easily broken. The paints used often dried, flaked, cracked, and peeled, leaving the painting damaged.

This was a popular method for painting clock faces and cases in the 1800's. This style of painting is centuries old. The most popular paintings of the day were silhouettes of famous people or buildings, often painted on concave glass in oval gilt frames. Less popular paintings were of houses, churches, and bridges, often depicted with trees and water, painted on flat glass and framed in ornate wooden frames. Many times chips of mother of pearl were used as window panes and occasionally bits of German glitter were also used.

As far as treasures go, I'd have to pick a piece of needle work that was done by my father-in-law. Yes, you read that right, he stitched this piece. It was done with one of those mass produced kits, is of no monetary value, but is priceless to me. When he became seriously ill after his second bout of cancer he had some very long hospital stays. He was always very creative, painting, ceramics, woodworking, even occasionally doing needlework.Making his way to the hobby store before yet another long hospital visit he picked out a needlework kit to take with him to pass the time. No one knew about the kit. He kept it secreted away and worked on it when at night when we had gone home to rest. He made it as a special gift for my mother-in-law. He gave it to her to frame. She never told anyone about it and tucked it away for framing later and either forgot about it or could not bear to take it out after his passing.When she passed away my husband and I were cleaning out her hobby room and I found it in the bottom of a sewing drawer under some fabric. It was lovingly wrapped with a note attached. It told the story of who stitched it and how it was given. In that moment, I felt I had found the greatest of treasures, a gift made by my father-in-laws hands for the wife he loved so much for the very last anniversary they would spend together. It is not stitched well as he was so very ill at the time but every single stitch was made with love. It has their names and wedding date in the wreaths. This is a piece I truly treasure.

In the area of keepsakes, I have been a big bin of handwritten journals. They have been written over the last 13 years. They were began shortly after I became a Christian. They are my children's spiritual heritage. I have written almost daily with a few exceptions. These volumes include events, prayers, praises, thoughts, feelings, stories, poetry, devotionals, inspiring quotes or lyrics, snippets of sermons, life lessons, anything that I am inspired to write on any given day.My desire to write these began when my husband and I started a new chapter in our lives. We are the tradition bearers of faith in our family. The heritage of faith was not passed on to us, we had to originate the tradition and pass it down. Our children are the second generation of believers in our family. I had relatives who were believers, my grandmother and aunts and uncles, but they lived far away and spending one week out of 52 did not make a huge impact in the area of faith in my life. There were a few stops and starts in church attendance when I was growing up but that is about it. I was inspired to start these journals after reading the following Scripture, "This shall be written for the generation to come: and the people which shall be created shall praise the Lord." Psalm 102:18 This is the inscription I hand painted on my drop leaf writing desk. I had a deep and burning desire to leave a written legacy, a road map, if you will, on the journey of faith. I kept thinking, "Why has no one told me this or that?", "Why was this truth not shared with me?", or "It would have much easier if I had only known such and such." I had to find a lot of the answers for myself and so will my children and their children, but in recording my journey, I hope to show them that through it all, heartache, sorrow, joy, and blessing, God is faithful. My hope is that when these writings are passed down through the generations, my descendants will read of specific events, times, places, and people that will reflect a legacy of faith, the beginnings of their spiritual heritage, one woman's footprints, leading them to the cross.

Blessings,
Miss Sandy

Friday, June 27, 2008

VINTAGE HANDKERCHIEF DRESS TUTORIAL.....


Recently my husband swept me off for a real treat, a week at the beach for my birthday! (In case you are wondering, I just hit the big 45!) Since it was my birthday week I got to do a lot of stuff that I like to do, like spend an extraordinary amount of time picking out handmade paper and browsing high end antique stores, a decorator showroom, and flea markets along with lazing and strolling on the beach, collecting shells, watching fireworks each evening from the pier, snapping photos, and dining in seafood heaven.


At one of my favorite antique stores in the area I saw the most darling way to display vintage hankies. This lady made these little hankie dresses and had them hanging on a jewelry display rack and they were stunning! They looked like a Barbie clothing store. I found myself sliding the little hangers across the bar like you would real clothing when you are shopping. I did not copy her design, hers were just plain cardstock and the dress bodice was drawn differently with no extra embellishments, hers were only line drawings of the dress details.

YOU WILL NEED:
A hankie
a six inch by 3 inch piece of cardstock that matches your hankie
8 inch piece of wire
embellishments of your choice
8 inch piece of ribbon
glue (I used hot glue)
repositional double stick tape
scissors
fine tip black marking pen
pencil
iron


*press your hankie flat then fold into a square and press.

*fold the 6 inch by 3 inch cardstock in half so you have a 3 inch by 3 inch piece.


*using a 3" by 3" scrap of paper, sketch our your dress design and cut it out, with a pencil lightly trace your pattern onto the colored cardstock, the fold will be the shoulders of the dress.

*cut out your design, be sure and leave some of the fold on each shoulder uncut.


*on one half of the dress, using the black marking pen, sketch your dress details.

*embellish if desired ~ I glued on a lace collar, lace trim on the bottom of the dress front, buttons, and a tiny silver heart at the neckline.

*bend wire in half, twist about eight times, bend twisted end over a pencil to curl, twist curl to the side to form the hanger, spread out the remaining ends, attach to the inside front of the dress, you may need to clip off the ends, then secure with a bit of glue, allow to dry.


*line up your hankie with the inside of your dress and secure with double stick tape on the front, the inside fold, and the back, press in place.

*Tie ribbon around the waist to close the dress onto the hankie.NOTE: This project does not damage the hankie, the low tack tape comes off easily.


What to do with a little hankie dress:


Imagine this darling as a gift tag!
It could be hung in an empty frame with the wall color making your little hankie gown pop!
Go a step further and giver her arms and a head and make her into a paper doll!
Hang a whole row of them across the top of a window for a sweet window treatment!
These would make great gifts for a ladies luncheon!
This would also be a great item for you art swappers out there!

This would be a great way to display grandmother's collection where you could enjoy your family heirlooms!

Blessings,
Sandy

Friday, June 20, 2008

Playing With Paper.....

I have been up to my ears in paper art in all my spare time lately. I have been making baby shower invitations, decorations, and gifts, making a wedding gift, and making a scrapbook as a thank you gift. I am enjoying my stint of being enmeshed in paper.Truth be told, I have a passion for paper whether it be writing, wrapping, tissue or crepe, or art paper of any kind. I have a special fondness for handmade papers. Recently on a trip to Florida, I stopped in a favorite scrapbook store where everything is always half price and bought a stack of hand made paper in all thicknesses and textures. My husband thought I was nuts buying so much. I explained to him that I can't get these specific types of paper where we live or in the nearby city. The one store that did carry them is out of business. We only travel to the area of this particular store about every other year so I NEEDED a two year supply! He just shook his head and said he was going to the smoothie shop next door to wait. I let him as I reveled in paper heaven!

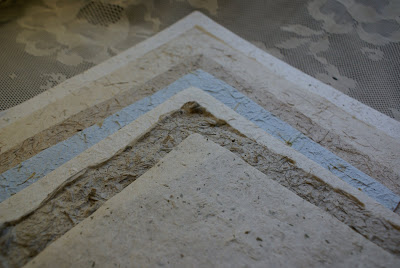
Below is a little sampling of what I got. This first one I was particularly excited about, this Mulberry paper is the perfect shade of blue and the materials in the paper reminded me of the pale blue specked eggs that are so popular in crafting these days, perfect for using for egg art!
I love these thick heavy sheets of recycled Mixed Organics. These handmade papers have a natural creamy shading which varies from a bleached out white to cream to tan and are embedded with natural inclusions like coconut fibers, water hyacinth, banana leaf, mango fibers and mulberry fibers, and more. This heavier paper is great for card making. These papers are usually about $3.00 per 12" x 12" sheet. A lot of these papers are made in Italy and Thailand.Ah, and these Mulberry papers are so filmy with an interesting fibrous texture and come is such vivid colors! They are versatile, they have the distinctive feature of easily feathering edges when the paper is wet and torn. I use an artist brush dipped in water to create my tear line and then gently pull apart. These papers come in a huge variety of colors, can be hand painted Batiks, marbles, smooth, textured, tissue, recycled, and mulberry florals. These papers can run from as little as 50 cents for an 8 1/2" x 11" sheet up to $5.00 per sheet for a 12" x 12" sheet. Nepal and Thailand are large producers of these papers.These are also Mulberry papers,even though they are thicker than a traditional Mulberry paper, they are embedded with botanicals. The thickness is due to the layering of paper pulp, fibers and botanicals, then another thin layer of pulp to seal in the botanicals.I also purchased some Indian Cotton Papers in these deep hued colors. The Jungle Green and Red are favorites to use at Christmas time for card making. These papers are produced in India and are usually around $2.50 to $3.00 per sheet.I even got a few Fabric Paper Sheets. This fabric paper is stiff and can be torn, sewn, die-cut , or frayed which lends to a wide variety of uses. This will be my first experience in playing with these.I also picked up a few rubber stamps and a couple of large punches. Purchases made, I headed out for a much needed smoothie with my sweetie.

Here is a sampling of what I have been up to. The beginning pages of a thank you gift book for special friends who have a new blended family. I thought a family album for creating and storing new memories would be a good gift. I am trying to do two pages per day until it is finished. I've had to put it aside this week and will focus on it next week. You can click on photos to enlarge for better viewing.
Please excuse the photo below! I realized after I had loaded it onto my page that I had left the plastic cover one the album and the templates for corner spacing in two of the frames! I thought about retaking the photo but decided you would get the gist even if it is not picture perfect!
Handmade invitations for one of my best friends daughters baby shower,with a sweet little picture of the guest of honor included! I just have to write the shower details in and pop them in the envelopes!I hope you feel inspired to make some paper creations of your own!

Blessings,
Miss Sandy

Monday, June 16, 2008

Griddlecakes.....

"For breakfast there were pancakes, and Ma made a pancake man for each one of the children. Ma called each one in turn to bring her plate, and each could stand by the stove and watch, while with the spoonful of batter Ma put on the arms and the legs and the head. It was exciting to watch her turn the whole little man over, quickly and carefully, on the hot griddle. When it was done, she put it smoking hot on the plate."

Little House in the Big Woods by Laura Ingalls Wilder
Throughout the series of Little House books, much of the action centers around food ~ hunting it, growing it, losing it to natural disasters, cooking it, preserving it, and eating it. On the frontier feeding the family was a task that took most of everyone’s time. For Pa there was no weekly paycheck to be exchanged for shelter, clothing, and groceries. Pa pursued the food with gun, trap and plow; Ma prepared and preserved it; and the children helped with both activities. Food also looms large in these pioneer chronicles because there was rarely enough of it.

Celebrations and social gatherings were a time for eating. Socializing for young and old took the form of church suppers and evenings at home popping corn and pulling candy. Laura shares in her books some of these special times and the special foods that were served at these gatherings.

The first kitchen Laura Ingalls Wilder describes in her stories is her grandmother’s kitchen in Little House in the Big Woods. Laura describes the celebration held there as a sugaring off party where she recalls making Molasses-on-snow Candy, a real treat. How many of us remember the real treats, the sounds, the smells, the sights and especially the tastes that were made in our grandmother’s, mothers, or aunts kitchens?

When I was a little girl, Saturday mornings meant a special breakfast, a break from oatmeal, cold cereal, or toast and jam. I was given a choice of French toast, Griddlecakes, or Waffles. I almost always chose Griddlecakes! They were my favorite. Just like Ma, my mother would pour them into shapes or sometimes she would stand at the stove for as long as I desired and make me dollar cakes. Dollar cakes were the size of a silver dollar, bite size really. It took a lot of dollar cake to fill me up, but she was very patient when I chose dollar cakes.

Recently I was transported back into time by a sight and smell of Griddlecakes in my own kitchen. It had been a very long time since I had had one and I decided one Saturday morning to make them. I pulled out the recipe written in my mothers elegant script, assembled the ingredients, and heated the cast iron griddle on the stove. After stirring up the batter and pouring it onto the griddle, I stood, spatula in hand, patiently waiting for the edges to crisp turning a golden brown, and for the bubbles to appear on the surface. I often peeked over my mother’s elbow to watch for the fragrant bubbles to rise to the surface and burst releasing that heavenly smell.

As I stood there and inhaled the aroma, tears sprang to my eyes remembering the sight of mama in front of her avocado green double oven cooking griddlecakes in her cast iron skillet, spatula in hand, head bent in concentration, and the quick flip of her wrist, the sizzle sound of the griddlecake being turned. Hot homemade syrup was always at the ready as was a generous dollop of whipped butter. Mama prepared these before mixing up the griddlecakes.

My daughter was sitting on the table swinging her legs and watching me. She asked me why I was crying over a griddlecake. I brushed away my tears to better see the bubbles rise and I had no answer. It was just a happy memory, a golden part of childhood on day when things were calm and good in our home. It was remembering this small act of love.

When my griddlecake was done I slathered it butter, quickly cooked another and slid it on top of the other, topping it with a pat of butter and hot syrup. Before I took that first delectable bite, I grabbed my camera and took a picture. My daughter through I was nuts. Then I cut it into squares, like I did when I was young, and savored every mouthful under my daughter’s watchful eye.

She always wanted them poured into shapes when she was young but she would never eat them! She declared she wanted to try one now and I took my stance at the stove, spatula in hand, head bent in concentration, a quick flip of the wrist and the sizzle sound filled the air as the griddlecake was turned. Hot homemade syrup was at the ready as was a generous pat of butter and the tradition continued.


OLD FASHIONED GRIDDLECAKES
(makes 8~4 inch~griddlecakes)

1 Cup all-purpose flour
2 teaspoons baking powder
1/2 teaspoon salt
2 Tablespoons sugar
1 Egg
1 Cup milk
3 Tablespoons butter or margarine

*Sift flour with baking powder, salt, and sugar into a medium bowl.

*With rotary beater, beat egg. Add milk and butter; beat until well mixed.

*Pour into dry ingredients; beat only until combined~batter will be lumpy.

*Meanwhile, slowly heat griddle or heavy skillet. To test temperature, drop a little cold water onto hot griddle; water should roll off in drops.

* Use about 1/4 Cup batter for each griddlecake; cook until bubbles form on surface and edges become dry. Turn cook 2 minutes longer, or until nicely browned on underside. Serve with whipped butter and hot syrup or your topping of choice.

VARIATIONS ~ using the above recipe and additional ingredients listed below:

APPLE GRIDDLECAKES
Add 1 Cup pared, thinly sliced apple to Griddlecakes batter; cook as above. Serve with Spicy Applesauce(recipe below)

BANANA GRIDDLECAKES
Sift 1/8 teaspoon nutmeg with Griddlecake dry ingredients. Add to batter 1 Cup mashed banana and 2 teaspoons lemon juice; cook as above. Serve with whipped butter and Hot Maple Syrup(recipes below)

HONEY-SPICE GRIDDLECAKES
Sift 3.4 teaspoon cinnamon, 1/4 teaspoon ginger, and 1/8 teaspoon nutmeg with Griddlecakes dry ingredients. Add to batter 1/2 Cup uncooked; quick-cooking oats and 2 Tablespoons honey; cook as above. Serve with whipped butter and Orange-Maple Syrup or Praline-Butter Sauces(recipes below)

PECAN OR WALNUT GRIDDLECAKES
Add 1/2 Cup chopped pecans or walnuts to Griddlecakes batter; cook as above. Serve with whipped butter and Sour-Cream Topping(recipe below)

RICE GRIDDLECAKES
Sift 1/2 teaspoon cinnamon with Griddlecakes dry ingredients. Add to batter 1 cup cooked white rice; cook as above. Serve with Praline-Butter Sauce.

WHOLE-WHEAT GRIDDLECAKES
Reduce milk in Griddlecakes to 3/4 Cup plus 2 Tablespoons. Add to batter 2 Tablespoons light molasses and 1/2 Cup crushed bite-sized shredded wheat biscuits; cook as above. Serve with whipped butter and Hot Maple Syrup.


WHIPPED BUTTER
(makes about one cup)

1/4 lb. sweet or salt butter

*Let butter stand, at room temperature, in small bowl of electric mixer 30 minutes.
*Beat at a low speed until smooth; then beat at high speed until light and fluffy, about 10 minutes in all.
*Mound high in small bowl. Serve at room temperature.

TOPPINGS:
Special sauces and butters compliment the flavor of pancakes and waffles. You will find a wide variety of syrups on your grocer's shelf. But you'll want to try these easy recipes, too.

BLUEBERRY SAUCE
1 can (14 1/2 oz.) blueberries
2 Tablespoons light corn syrup

*Drain blueberry liquid into small saucepan. Stir in corn syrup.
*Bring to a boil; reduce heat, and simmer 10 minutes Stir in blueberries. Serve warm.

STRAWBERRY SAUCE
1 pkg. (12 oz.) thawed frozen sliced strawberries
2 teaspoons cornstarch
1 teaspoon lemon juice

*Drain strawberries, reserving liquid. In medium saucepan, combine 1 Table spoon strawberry liquid and the 2 teaspoons cornstarch; stir until smooth.
*Add remaining liquid, the berries, and lemon juice; bring to boiling, stirring. Sauce will be slightly thickened and translucent. Serve warm.

HOT MAPLE SYRUP

1 Cup dark-brown sugar, firmly packed
1/4 teaspoon maple flavoring
2 Tablespoons butter or margarine

*Combine sugar and 1/2 Cup water in medium saucepan; bring to boiling.
*Boil, uncovered, 5 minutes. Add maple flavoring and butter; stir until butter melts. Serve hot.

ORANGE-MAPLE SYRUP
1 1/2 Cups maple-flavored syrup
1 Cup butter or margarine
1 1/2 teaspoons grated orange peel

*Combine all ingredients in medium saucepan; bring to boiling.
*Reduce heat; simmer, uncovered, 3 minutes. Serve hot.

ORANGE BUTTER
1/2 Cup butter
2 teaspoons grated orange peel
6 Tablespoons

*Work butter until very soft. Stir in orange peel and sugar until smooth. Serve at room temperature.

PRALINE-BUTTER SAUCE
1/2 Cup butter or margarine
1/2 Cup light brown sugar, firmly packed
1/4 Cup chopped pecans

*In small bowl, using electric mixer at high speed, beat butter until light and fluffy.
*Gradually beat sugar until very light and fluffy.
*Add pecans. Serve at room temperature.

SPICY APPLESAUCE
1 jar (1 lb.) applesauce
1 Tablespoon butter or margarine
1/2 teaspoon nutmeg
1/2 teaspoon cinnamon

*Combine all ingredients in small bowl; blend thoroughly. Serve warm or cold.

SOUR-CREAM TOPPING
1 1/2 Cups dairy sour cream
2 Tablespoons honey
2 Tablespoons light-brown sugar
1/8 teaspoon nutmeg

*Combine all ingredients in small bowl; blend thoroughly. Serve at room temperature.

Enjoy!
Miss Sandy

Related Posts Widget for Blogs by LinkWithin