HomeARTWordsStudioTutorialsClassesShop

Thursday, July 30, 2009

A Few Finds, Furniture, and a Face Lift Update.....

"It takes hands to build a house, but only hearts can build a home."
~Author Unknown~
Yesterday I had to run away from home for a little while to keep my sanity from all the sawing, hammering, ripping out, putting back, and mostly from the MESS! I called my friend Sweet P. totally prepared to bribe her with brownies, homemade no less, to let me come over for a while but she didn't answer. I was even ready to throw in vanilla ice cream, fudge sauce, AND nut topping just to escape, not that she needed bribing but a treat is twice as nice when shared with a special friend.I have to say that were she home and had I brought along a savory treat I would not have eaten even one bite, no way, no how. First, because I don't like chocolate and secondly because I had Gorgeous Grandson over the weekend. He kept running up to me and throwing his arms around my hips hugging me, he is only hip high after all, gazing up at me with his big blues eyes, smiling with his crooked grin, and saying, "Hi pumpkin." Now, I wasn't sure if he was just repeating a term of endearment I use with him or if he was referring to my nether regions! In any case I'd best not take any chances, so no sweets will be slipping trough these lips and adding to those hips!Today I am hiding out in the studio. See that lump behind the curtain? That is not Gorgeous Grandson playing peek-a-boo, it is me cowering in the closet trying to block out the screams. Right now there is a big muddy booted man sloshing in and out of my front door. I hear each squishing menacing step as he nears my bedroom door and then the screaming begins as every carpet fiber writhes in agony as mud is ground into it. Oh, wait a minute, I thought that scream was familiar, that wasn't the carpet, that was me.I cover my ears to block out the scratchy sound of wires being pulled through the walls. It sounds like the feet of a million little mice scurrying. The high pitched whine of the table saw and the thumps, bumps, and bangs coming from all directions has me surrounded and mostly I am sitting here thinking of the MESS.
The rhythmic pounding of the front steps being removed sounds like a heart beat. It really is a labor of love as Handy Hubby gives blood (there was a smashed finger!), sweat (the humidity is killer this week!), and tears (we laughed so hard we cried over the wasp incident!) to make our home not only beautiful but easier to maintain. I will cheerfully cook, clean, and be an extra set of helping hands when needed. So, if you wonder how the face lift here at the Quill is going, my house has never looked uglier or been dirtier! For someone who is a bit OCD in the clean and organized department this is making me nuts.As I said at the beginning of the post I did escape for a little while yesterday. I went to pick up an old chest Handy Hubby and I had seen that we thought might actually suit both of us. You might remember when we went to pick out an ottoman together and never came to an agreement. We both agree that this antique cedar chest on casters fits the space perfectly. We both love the rich tones of the wood, the fact that it can easily be moved, has storage, and is sturdy. I also picked up an inexpensive rug to use under the chest so the casters won't scratch the floors. Hmmm., perhaps I should have straightened up those sofa cushions before snapping that photo, too much trouble to retake and up load, what you see is what you get!Best of all I stopped at The Mall! Now don't be mistaken, this is not your typical clothing and shoe store kind of mall. It is a huge antique/flea market that you could spend days browsing in. I have a few occasions coming up in which I need gifts for and I love to find unusual items to present them in.

I found this darling little basket...
An old hat covered in roses with yummy velvet ribbon trim...And an old purse, all of the items were only a couple of dollars each.Then there were three items that I bought for nostalgia. A Big Chief Writing Tablet, I used these in school when I was a little girl. If you had your cigar box full of pencils, scissor, and crayons and your Big Chief writing tablet you were set!Two Christmas Elves,(fifty cents each), who can resist these two cuties? My paternal grandmother had a collection of these and I have such fond memories of decorating and playing with them. The sight of them makes me smell frosted sprinkled sugar cookies which we always baked at Christmas.
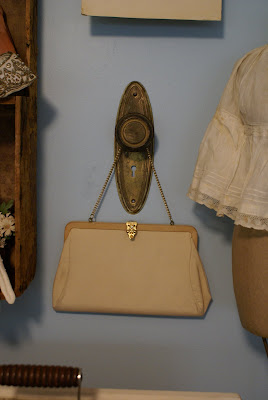
I feel an art project coming on with these next items! A couple of Art Deco switch plate covers for a dollar each...
A tarnished fifty cent frame, perfect for a collage...A darling little fifty cent hand painted black lacquer set of drawers that remind me of my mothers jewelry box...A tarnished sugar scoop...I have a couple more of these, I don't think they were in the photos of my studio though. I have ordered some German glass glitter and I want to use the scoops for holding the glitter while I am working. The scoop will make for easy sprinkling and it is just something pretty to use to boot.

Lastly, I found some rolls of old wall paper...
Are they not pretty? Wait, what did that sticker say? FREE, seriously, for free! I admit I was greedy, I snapped them all up. However, I do plan to share, I won't keep it all to myself.

That kind of catches you up on the happenings here at the Quill. I hope you are all having a wonderful week, it is time for me to come out of the closet and return to clean up duty!

Blessings,
Miss Sandy

P.S. If you are wondering about the unrelated photos in this post, well, I just needed a little bit of pretty to soothe my frazzled nerves!

Monday, July 27, 2009

Studio Storage.....

"In successful organization, no detail is too small to escape close attention."
~Lou Holtz~
If you did not get chance to visit the Where Bloggers Create Blog Party you really should. Just scroll down Karen's sidebar and click away! Wow, talk about an abundance of ideas and creativity! I am still visiting all the links and have only gotten through the M's so far. I found several new blogs to explore and will be sharing those links with you in a later post as well as tons of ideas and inspiration.

Thank you all so much for the sweet comments on my studio space. I really appreciate all the bloggy love! I have to confess that I was really really nervous to share it. After seeing Sunday Hendrickson's studio in Volume 2 of Where Women Create I felt better about showing it. I don't have one of those wildly eclectic spaces. I am more of a matchy matchy type of gal and I like my clutter to be very organized. Sunday's studio shares the color combo of blue and green just like mine and her space is so organized! She even has cozies and covers over her printer, fax machine, and file cabinets, my kind of gal! Anyway, hats off to Sunday for giving me the courage to share my studio. You can see some peeks of her home and studio here in this post at Chez Fifi (blog home page).

I had some specific questions about my studio space and storage solutions so I thought I might share that with you.
The room measures 11' 4" by 10' 4", plus I have closet space that is 5' by 2'. I have room for three people to work comfortably if I remove my portable sewing machine from its table. The color of my space is Midsummer's Dream by Olympic that I purchased at Lowe's. The color was chosen to match the small blue flower in the print on the vintage drapes that serves as closet doors and the blue stripe on the fabric of my inspiration board. I removed the bi~fold closet doors to have room for cabinetry. I accented with hits of the acidic green.My window treatments are white linen fabric that I got on clearance hemmed on all four sides. I used blue and green satin ribbon to create a stripe on the panels to mimic the stripe on the fabric by ironing the ribbon on with fusible tape. I used silver grommets across the top of each panel. The hooks are actually shower curtain hooks that I found at a flea market for a $1.00. I drilled a hole in them, turned them upside down, and attached them to the wall with silver screws to install the panels on.I adore all those spaces out there created with fun furniture finds but I am a use what you have or what you have access to kind of girl and I had access to all the cabinetry in my space for the just right price of free! Well, not exactly free, Handy Hubby got them on the barter system. He helped a guy in the cabinet business install a fence and the guy gave him the cabinets in trade for his labor. The three that look like cupboards are actually two wall cabinets stacked on top of each other. To have a little fun rotating display space I took the doors off on one set and added fabric backing.Yes, nearly every container in my space is labeled. This is not so much for my benefit but for those who come over to play, they can easily find any extra supplies they might need without me having to direct them. Handy Hubby and Darling Daughter frequent the space too, as does my son, to filch art supplies for his art classes. They can find, borrow, and put away what they need.

The holders for my paint brushes, colored pencils, and gel pens are actually candle holders that I found at Big Lots on clearance. I really love the open cut work design and that they have a wide opening to hold a lot of items.
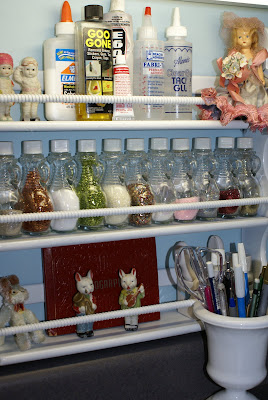
The rack holding my glitter and a few of my glues is an old spice rack that I spray painted white. I found the bottles I am using separate. They were old flavoring bottles. I think the lids soaked up the flavoring because whenever I use them I get whiffs of butter rum, vanilla, mint etc. I need to find a few more spice bottles for the glitter overflow that I have stashed in a drawer. These racks are also perfect for storing small bottles of acrylic paint. If you decide to use this for your storage, make sure your paints or bottles fit the rack. I took an empty bottle and a paint bottle with me flea marketing while searching for mine to make sure they fit.I find some things hard to store, stickers and rub-ons are one of those things. I have looked at several options and didn't like those pocket binder things as your sticker pages have to be specific sizes to fit them, so I came up with a simple solution that works for me. I purchased two expandable file folders in a sturdy material, standard file folders, and 12"x12" scrapbook paper.To cover the folder I placed a piece of waxed paper inside the folder and sprayed the front of the folder with spray glue and then put the decorative paper on top of the folder, smoothed in place, and removed the waxed paper. I trimmed off the excess paper around the folders curved edge. I mix matched my papers and used the cut off piece to glue to the inside top back of the folder, spraying the back of the paper with glue, smoothing in place and trimming off the excess. Once all the folders were covered I had them laminated, I knew they would last longer from frequent use, and then used my label maker to label them.For general stickers I made categories of: Borders & Corners, Misc. Stickers, Nature, Spring & Summer, Autumn & Winter, Travel, & Vintage. These work for the types of stickers I like to use. For alphabet stickers I used the same folder technique with labels of: Pastel, Primary, Neutral, Black, Silver & Gold, Glitter, and Quotes & Words. I put all the sheets of that type in the folder and then placed the folders in alphabetical order in the expandable file. When I need a certain type I can easily pull out the file, flip through and find what I need without digging through them like I used to.

These two files as well as one smaller one that I have for small color coded paper scraps sit nicely on the closet shelf within handy reach when I need them.
I usually have several projects going at once and needed a place to keep all the works in progress without having piles on every surface. Sometimes I am collecting for a project and also need storage until I have all the pieces I need on hand. Under my counter in the knee hole I had Handy Hubby add a shelf on both sides. My side holds a large wire basket that can store all my pending projects. I still need to sew a basket liner for it so small bits don't fall through. Right now it has six works in progress hiding under there.I have room to grow into this space since I edited my supplies to just the things that appeal to my style of creating. Since paper is a huge part of my crafting it is easier to store than most bulky supplies. I have acid free archival boxes with dividers in them for types of vintage ephemera like old photos, post cards, greeting cards, and small papers to use in collage. These are the boxes on the rolling cart that I am still working on getting the painted designs on. I plan to add three green boxes from the container store as soon as the size I need goes on sale. That will give me 13 boxes to store stuff in a small portable area of space.My drawers have inexpensive plastic baskets or liners to contain the tools I use frequently.I have previously shown you how I stash my scissors and how I use up card stock scraps as blank tags as well as how I store them here.To determine what I needed as far as storage goes, after culling all my supplies I laid them out in piles of groupings of alike things. I could then see how much of each type of item I had and how much storage I needed for each group. This helped me to decide on what type of containers I needed. I also did some careful measuring of shelves and cabinets so whatever I chose would fit.I mostly use inexpensive clear shoe boxes from Dollar General, they cost $l.50 each or divided storage containers so I can see my stuff. I love these little individual containers that fit into one acrylic box. The box holds 24 pop top containers and takes up a small amount of space to store. I got these at Hobby Lobby. They run about $5.00 each but I used the 40% off coupon to purchase mine.I also like these standard divided plastic containers for embroidery floss, beads, jewelry or misc. embellishments that I use in my art. These usually run around $5.00 each. I also used the 40% off Hobby Lobby coupon for these.I use three sizes of plastic drawer storage for holding paper, tools, and supplies. These are Sterilite brand and I purchased them at Wal-Mart. They run from about $5.00 up to $12.00 per container.Two things I would like to have is more actual wall space to hang pretty things on but I needed storage worse and different flooring. Since this was a guestroom it has carpet. I have to be patient until it is time to finish the hardwood flooring in the main living space of the house and then we can run it right down the hall into this room too. I have area rugs under the work spaces and if I am painting I throw down a tarp. Other than that I am happy with the space.

One very important thing to keep in mind is that a creative space is not born over night. I have been in this space for two years and it is just finding its way into order. It took me six months just to edit and figure out what I really used, needed, and could not do without to get it all down to manageable. I purchased containers a little bit at a time until I had all I needed for my supplies, until then everything lived in plastic zip bags. Take your time, assess your needs, and then make your purchases as budget allows.

Blessings,
Miss Sandy

P.S. I will be out of pocket most of the week this week. I will pop in and post if I get the chance. Handy Hubby is off this week and today we started working on the house to get it ready for its face lift! Until then, have a great week!

Friday, July 24, 2009

Where Boggers Create Blog Party.....

(Click on any photo to enlarge for better viewing)

Woo Hoo! Party day has arrived at last! Karen of My Desert Cottage is hosting a Where Bloggers Create Party today. To visit all the wonderful creative spaces, click on the highlighted link to Karen's blog, check out her space, then click on the links listed on her side bar to visit all the party goers. Thank you, Karen, for hosting such an inspirational event.
I am doubly blessed to have two creative spaces, my art studio and my writing cottage. Over the years I have graduated up from small almost nonexistent spaces to real rooms. My first crafting space was a 1920's porcelain topped table, our actual dining table, with supplies stashed under the bed in plastic bins. My writing space was a wall hung desk in the corner of our bedroom.

After my son married and moved from home, my daughter moved into his larger bedroom and we turned her room into a guest room. In a three year period we only had two overnight guests so I decided to quit dusting and vacuuming valuable real estate and converted the guest room into my art studio. I moved everything from a 8' x 16' out building, which is now my writing cottage. This was one
of the best decisions I have ever made. I love my room!

My art studio is a shared space. My daughter has her own corner and storage where she likes to sketch, edit her photos, or scrapbook. I also share my space with coats and um, well, dirty laundry. But you
can't SEE the laundry so its OK, it doesn't hamper (pun intended) creativity.

Without further adieu, I invite you into my hodge podge haven of inspiration and art!Darling Daughter occupies half of this back wall space. Here are some of her inspirational items and displays. Shall we take a peek at her sketch books? Love these! You can pick up hints of her quirky personality, likes, and sense of humor by viewing her space.

I have used family items as well as flea market finds to decorate my space. This is my fashion wall where my modern sewing machine hides under vintage flair. The sewing table tutorial can be found here. The framed broaches were my mother-in-laws. The necklaces and earrings belonged to my paternal grandmother. The little lady standing on the corner of the sewing machine is Inez, you might remember that it was she that got me grounded from Ebay! The pattern tissue paper flower, tutorial found here, and the framed paper doll are pieces of my art. The picnic baskets hold thread, embroidery floss, and sewing notions. The black case holds vintage patterns for use in crafting.This is my current display of babies and beauties. The ruffled hat, purse, and little black shoes and lamb box were mine when I was a baby. The Kewpie, The Thinker, was purchased at the Rose O'Neill museum and is a vintage original. Flea market finds and blogger art round out the display.Everything is coming up roses where a bevy of beauties repose among the roses. The head vases are what I refer to as my damaged diva collection. None of them are in perfect condition but perfectly beautiful to me.My daughter drew and famed this rose for me several years ago.There is a story behind this rose painting. I bought it at a flea market after seeing the signature. It was painted by my former neighbor who has passed away. Evidently her family got rid of some of her belongings and this ended up in the flea market. I loved it because I loved her. Our road is named after her family and she painted this the year I was born. It is not the best painting but I love the vibrant colors and the fact that sweet Mrs. Ophie's hand created it.

Here is the practical portion of my space, where I create! I have a lot of favorite personal items in this area but I have to say that my Shakespearean Raven Theater is my all time favorite piece of art I have ever created.
Dividing our spaces is this little vignette. I altered a jewelry box to use and an ink cupboard. I store ink pads in one side and alphabet stamps in the drawers.
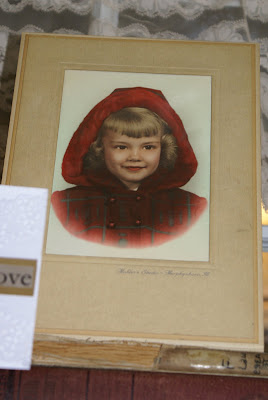
Here is the new build that I told you about in my last post. Don't let the lace fool you, that is where the dirty laundry is hidden. I have room for my printer and lap top which makes it handy for printing images for my art. I didn't really have time to thoughtfully decorate this area so I have a bit of this and that. I LOVE that vintage photo that I call Little Red Riding Hood, she is so adorable!The altered tin bucket I made for and art challenge just looks like it is filled with yummy lace, the lace is hiding a bucket of dead dolls. I rescued them from certain death due to dismemberment. They all need their heads and arms reattached. I'll show them to you when they are more presentable.

I am still working on stamping and hand painting these storage boxes. You can find a tutorial for theses boxes here. Above hangs one of my collage projects.Here above my paint cupboard is my button cubby where buttons are sorted by color and in cute little jars. My gathering basket is at the ready for our next commune with nature. Rolls of vintage wall paper or stored in the corner.
The closet is where I store gift warp, paper supplies, embellishments, and scrapbooking supplies. Oh, and coats too.I have a couple of spaces that I can rotate little collections of inspiration or display art. I have to tell you as I went around the room I got a bit weepy from all the blogger love in my room. I have 30 items that were gifts or little handmade pieces of art in my room! This does not count a collection of tags I have tucked away in an old hat box waiting for their turn to be displayed. That is a lot of blog love!

I don't like to see my supplies everywhere but I do like to see my supplies where they are stored so in all my cupboard spaces so I used clear plastic storage containers that are also labeled. Back in January I began to go through all my supplies and really edited them down to only the things I love to create with. I don't have a lot of everything but a little of a lot of things. I have learned not to go willy nilly over the latest gadget, gizmo, or hot product of the moment. I find I am more apt to create when I am using what I am personally drawn to.

Obviously I can't stash everything in my tiny room so I utilize other spaces for overflow. Vintage linens in the hall closet, bulk fabric, fiber fill, & foam in the storage shed, one large bin in the storage shed for project items like frames, boxes, etc., spray paints and painting supplies for large projects in the man cave, Handy Hubby's shop, and overflow of art, decorating, and design books all over the house.

My writing cottage is situated next our garden pond and is decorated in a beachy style. I love this space because no matter the time of year it feels like a summer get away. If you would like a short peek at my writing space, you can visit this previous post.

I hope you have enjoyed viewing where this blogger creates. If you have any specific questions about my spaces, feel free to post them in the comments section and I will address them in a later post. Now, I am off to visit all the other inspiring spaces!

Blessings,
Miss Sandy
Related Posts Widget for Blogs by LinkWithin