HomeARTWordsStudioTutorialsClassesShop

Monday, April 30, 2012

TIME TO CELEBRATE, GIVE AWAY SIGN UP...

 PLEASE NOTE THAT THIS GIVE AWAY IS CLOSED.
 Time to celebrate the grand, OK, maybe grand is too large of word, diminutive, yes, that is much more like it, diminutive opening of my new Etsy shop.  (someday it hopes to grow up to be grand shop)  In honor of the shop opening I am hosting a give away!
 
Here is a little exert from an earlier post when my give away prize was created:
 
"I first met her on a chance encounter. She was milling around in a box full of strangers. She looked to be no more than 16 years of age. There was an air of sadness hovering around her. The faraway gaze in her eyes as well as the unique perspective of the photo drew me to her.
 
At the time, I wondered who she was. What was she thinking when this was taken? At what far off point did she fix her gaze? What was the occasion for this photo? What was her story? Photos are generally taken to commemorate an occasion or to preserve a memory. It made me sad that she had slipped from someones memory and ended up in a dusty box.
 
Wishing to honor this young girls memory, I chose her as a center piece for a new work of art. While working with the photo I made a discovery. On the back of the photo frame in the faintest of faded scrolling script was a name, address, and city. It was too dim with age to make out with the naked eye. Using an LED jewelers loupe I was able to identify her. Excitement mounted with each discernible letter.
 
 
Her name was Cottage...Cottage Bealle. Her address was 985 N. W(smudged out and unreadable) Street, Danvers, Illinois. I googled to no avail, I could find no trace of her or even her surname. There are several other spellings of Bealle and I wonder if through the years it was changed as so often happens. I only wish there would have been a date or that the street address was not smudged away. The photo is mounted to the frame so no luck there either.
 
Here is what I think is the wonderful part of her story. I began gathering the fabrics and elements of this fabric collage before I made this discovery. The piece was almost complete and I was ready to attache her when I saw the writing. The entire piece has a cottage feel to it with the faded lightness of fabrics and fibers. How perfect is that?"
 
Sadly, Cottage has been relegated to another box since her creation, she is ready to come out and come and live with one of you!
The collage measures 12 in. wide by 17 in. high, is fully finished on the back and ready to hang.

To sign up for the give away simply leave a comment.  
All are welcome to enter, no restrictions.
A winner will be drawn and announced one week from today on Monday, May 7, 2012.
 
I hope that each of you know how I cherished you and your constant encouragement, friendship, and support. Blog friends are just the best!  My little shop would not be possible if you did not take an interest.  Thank you for that.
     

Friday, April 27, 2012

WHAT'S ON THE WORK TABLE (FREE MINI EMBOSSING ENAMEL TUTORIAL INCLUDED)...

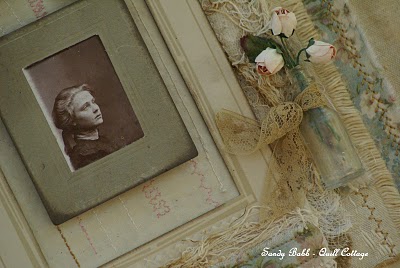
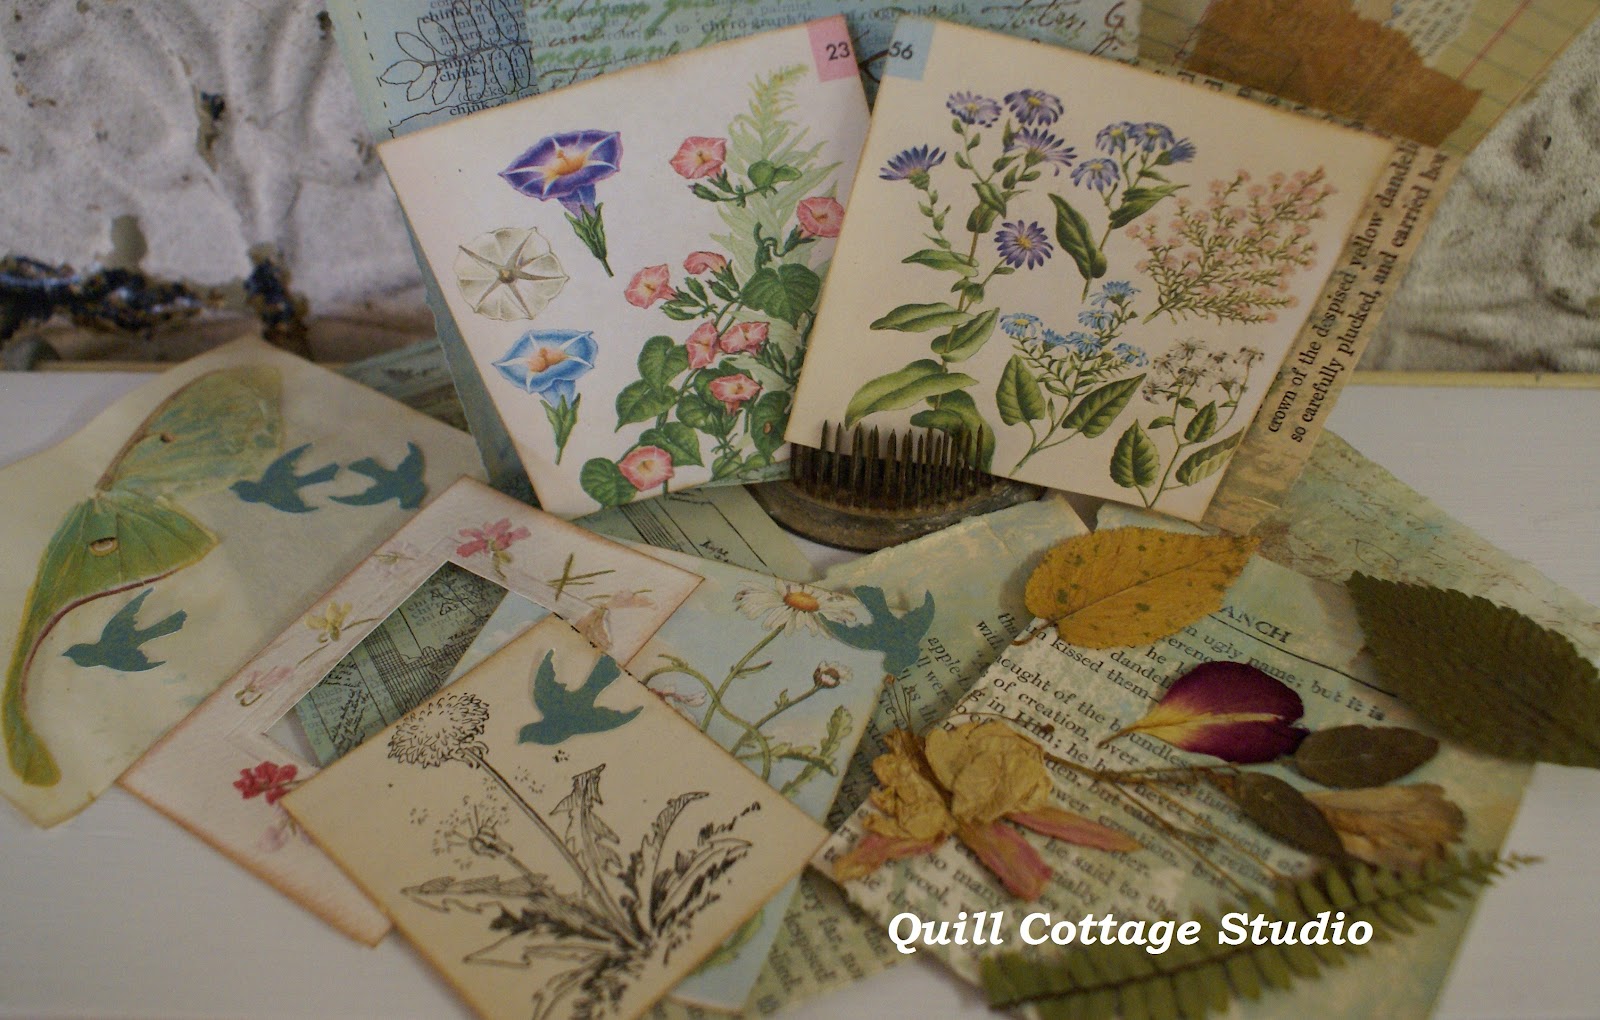
  I have been working diligently this week on the mixed media book for possible submission for the open art call from Seth Apter (The Altered Page).  My work table is covered in clutter once again and somehow I feel I have very little to show for it.  Six of the seven main page elements are on the cusp of being done, each one needing just a little finishing touch or two.   Maybe I will stop at six and focus on the backgrounds and assembly but I so do like odd numbers with something like this.
 (Shimmering Sun)
I got hung up in the process yesterday sensing there was something wrong and I think I have figured out what is and what I need to change.  This moving in a different direction often happens to me.  I start out with a concept or idea that may or may not work as the piece is actually being created.  In this case I wanted to use, and if I can get it to look right I still might, some hand dyed fabric as the page bases but it is looking too dark right now, too gray/black and detracts from the page elements and is a little visually distracting.  
 (Brooding Moon)
I also set out to try and create a more gritty piece, well that ain't gonna happen either!  Maybe slightly girly grunge?  Or maybe not!  I am what I am, I am who I am, I create how I create...more of a Naturalist Melange Rustic Romantic or Hillbilly Chic in style...and it is kicking and screaming its way out of this piece.  I think it is braver to be me at this point than to force something that is just not working.
 (Emerging Life)
 I tend to be extremely detail/technique oriented and that has slowed this process way down due to so much drying time.  Within the six small elements I have managed to throw in everything but the kitchen sink and that might be in there too before this little book is done.  Let's see there is wire work, beading, hand dying fabrics and other textiles, stitch, resin casting/paper, collage, burning, embossing, wax work, enamel work, metal work, paper making, plaster, paint, ink/stamping, book binding, and I am not even through yet!  Whew!  This is fun!
 (Tree of Life)
 Want to join on the fun?  How about learning a new (to me) technique?  I have never worked with Embossing Enamel but after reading a snippet of an article that mentioned it I decided to do a little research on the product and its uses.  This product has been around for a while.  It is a great dimensional medium for paper, fiber, and decorative arts, smart scrapbookers probably already know all about it.  
 
(Web of Deceit)
 Unlike most embossing powders that are super fine, the Ultra Thick Embossing Enamel by Ranger has larger particles that produces a resin like finish without the sticky mixing/pouring/drying time. It comes in clear and in colors.  This product would be great for jewelry or embellishment making, plus you can melt it and pour it into molds to create 3-D artifacts.  Another plus is that you can do some cool effects with this that you can't do with resin, like crack it for a cool aged effect or stamp into the surface while it is still warm for a texture effect.  I even tried this over an image printed transparency backed with card stock and it worked great!  
 
(Flight of Fancy)

Good grief, so sorry, I sound like an infomercial!
Just trying to tell you about a cool product.

ENAMEL EMBOSSING:
WHAT YOU WILL NEED:
*UTEE Ultra Thick Embossing Enamel (Clear) by Ranger
(Can find at Hobby Lobby or Michael's in the section with all the ink pads and rubber stamps or online, this product can run anywhere from $5.00 up to $20.00 depending on the size, so don't forget to use those coupons from your favorite craft supplier!)

*Metal Art Craft Sheet or any other protective non-stick surface
(I lined a small old baking pan with aluminum foil - the sides helped to keep the enamel bits from being blown everywhere in the heating process)

*Embossing Heat Tool

*Embossing Pad, Glue Pad, or other Clear Adhesive
(I used Liquitex Matte Gel Medium and it worked just fine)

*Image printed on card stock 
NOTE: If you are using a paper printed or original piece of ephemera that is thin paper, glue it to a piece of card stock and trim out before embossing.  It is best to do this technique on a heavy papered image for best results.

*Tweezers

*Emery Board or Fine Grit Sandpaper or Scissor, if needed

*OPTIONAL:
Alcohol Ink and blending tool or cosmetic wedge
(I used Tim Holtz Adirondack Alcohol Ink in Caramel by Ranger, also found at Hobby Lobby, Micheal's or online)

INSTRUCTIONS:

*With a glue pad, embossing pad, or other clear adhesive coat the front of your image. Place image on non-stick surface of your choice.
*Using a plastic spoon, sprinkle the surface with Embossing Enamel particles, making sure to avoid as much excess as you can, this will save so much finishing of the edges at end.
 
*Hold image in place on non-stick surface with tweezers and heat embossing enamel with heat tool
CAUTION:  This stuff is very, very, very HOT!  DO NOT TOUCH while hot or will cause a burn!
This first application will bubble up and be very bumpy looking.
*While the melted enamel is still hot, apply another coat of embossing particles and heat again until product is shiny and smooth. Repeat until you have 4 to 5 coats, allow to completely cool if you want a slick smooth shiny surface 
OR keep going and take it a step further...

To Crackle Your Embellishment:
*As soon as last melt is done, while the image is still warm not hot, remove it from the non-stick surface, (a designated spatula works well but don't use with food afterwards), place in the freezer for about 3 minutes.

*Remove from freezer and gently bend the enameled image and it will crack like glass, if you bend it too much you might crack all the way through to the image, if this happens no big deal!  Just reheat the surface with your embossing tool and the cracks will smooth right out, repeat the freezing process and try again.
Use as is or take it one step further to antique the image...

To Age Your Cracked Embellishment:
*Apply Alcohol Ink to the cracks, you can work it in with a makeup wedge or blending tool for a light antique effect
OR, for a deep aged effect, gently bent open the cracked places and apply the ink directly to them letting it really seep into the cracks then wiped it off the excess.
FINISHING TOUCH:
*If the enamel leaves a rough or uneven edge to your image use and emery board or fine grit sandpaper to sand smooth or trim away with a scissor.
You can see on my sample where I bent it too much and the ink application kind of ran on the image behind the embossing but since this vintage tag already had natural age stains it was fine with me.  It takes a little practice to get the cracks just right.
SAFETY TIPS FOR THIS TECHNIQUE:
*Be aware that this product has fine particles and when you apply your heat gun some of them WILL fly away, so work in an appropriate area.

*If you are worried about inhalation of the fly away particles wear a dust mask, a really good idea for those with allergies.

*Safety eye wear will keep the fly away particles from harming your eyes.

*This product is very hot, be careful not to touch it during the process and children should not be allowed to participate in the use.
 I can see some cool shipping tags or ATC's done using this technique, maybe when I am done with the book I can play with this a little more.

Enjoy!

Have a great weekend!
P.S.  I will have the promised give away sign up posted on Monday!

Wednesday, April 25, 2012

NEVER FEAR! BLOGGER HELP IS HERE!

 I know many of us have had our knickers in a wad over the new Blogger interface and all the changes/learning that will require to post and manage our Blogger based blogs.  Yesterday I signed in and there was my nemesis staring me in the face, the new interface.  I would have panicked had I not had  Building Beautiful Blogs by Karen Valentine.

If you are new blogger or someone who is thinking about starting a blog, this is for you!
You will learn how to create and customize your blog plus all the ins and outs of all those tabs, options, posting, this really is easy blogging A-Z!  Not only do you get written instructions but actual screen shots to show you the how to process.

If you are already a blogger using Blogger and want to master that new interface, this is for you!
Karen has even covered that dreaded new dashboard interface for us!  Step-by-step photographed screen shots walk you easily though the new process. 

Building Beautiful Blogs includes 85 pages of valuable tips, tricks, and information to help you customize Bloggers new templates and navigate the new interface, the download includes:
A glossary of terms
Introduction
Creating your blog
Customizing your blog
Everything about choosing templates, layouts, backgrounds, headers, etc.
Everything about your design page, posting, comments, stats, earning, privacy, publishing, permissions etc.
Karen includes information on mobile and email blogging options
You will learn about your sidebar and every gadget available to enhance your blog
Plus all about posting, editing, general blog tips, and so much more.
AND that dreaded new interface is included in this well worth it wealth of information!
Even this old blogger learned a few new tricks!

So, Never Fear!  Blogger Help is Here!  If you have any questions on Building Beautiful Blogs I would encourage you to visit Karen at My Desert Cottage or Valentine Design.  This truly is a tool for all skill levels of bloggers using the Blogger format.  If you have a Blogger blog this is a "must have" book well worth the purchase price of $19.99.

Thanks so much Karen!  Now I won't have quit, move, or plain old delete my blog!

Hope this information helps some of you too!
Have a blissful day!

Monday, April 23, 2012

GRITTY VS. PRETTY...

Generally when I invite you into my studio I like to have it company ready and rather pretty but the truth is most of the time it is on the gritty side like this...
Art making for me is messy business.  I may have two or even three things going at one time, like a fabric book page that is being embellished, an art kit being assembled, rubber stamping for another project, and a wire and bead project for yet another project all scrambled up together.  Eventually I do come out of my crafting daze, regain my senses, and realize what I have done.  I stop and clear away the evidence of my method of madness... 
And most of the time when I create art, much to my chagrin, I make pretty art.  By that I mean it is usually restrained, color coordinated, and leaning towards the cute side, which kind of makes me crazy!  This past week I have been focusing on a project that I hope is a little more rustic, darker, and gritty.  Remember those fabric pieces I dyed and messed up?  The one that looked like a microscope slide was perfect for what I had in mind so I ripped it down into little fabric pages...
 Remember all those rusty things I gathered to dye the fabric with?  They are also perfect for this project, many already transformed into page elements...
 And what is the project?  A mixed media fabric art book!  What inspired this process?  Seth Apter. (The Altered Page)  
He currently has an open call for mixed media artist to submit a 5in.x5in. piece of art to possibly be accepted as part of his book tour, gallery, or exhibit work.  These art pieces will be his to keep and select pieces will travel with him as he promotes his new book, The Pulse of Mixed Media.  They will also be featured on his blog. 
 Now, will I actually send this book to Seth?  More than likely not, the deadline is looming large at April 30, 2012 and I might not have time to finish the book like I think it needs to be for that type of submission. (You can find all the specific details HERE.)  
 But, the point is that it challenged me to think and stretch myself beyond my normal pretty to reach deep down and find the gritty, draw it out, and apply it to a piece of work...
 I have not been satisfied lately with what I have been making so I am setting off on a new path of discovery.  Never fear, there will still be pretty here, while I am waiting on things to dry with the gritty book, I am also making a pretty book...
 Remember one of the other pieces of fabric I messed up and said it looked like birch bark?  Well it does!  Check out these tree trunks...
 I actually made the majority of the mess you see above working on this one tiny 5in.x5in. piece!
One of the great things I learned while working on this challenge, even if I don't actually participate, is I really enjoy working small scale, who knew?

I've got more grit to grind!
Hope you are all enjoying a pretty day!

Thursday, April 19, 2012

NEW ETSY SHOP NOW OPEN...

I am reaching (my word for the year) for another one of my goals I set for myself and took the plunge to open an Etsy shop in lieu of having a blog post type shop.  Look at my fantastic new banner that Karen of My Desert Cottage and Valentine Designs helped me make using my artwork as a back ground...
 Now when you push my little blue sidebar button...
 You will be directed to my new Etsy shop!

I have made my first listing, four new art kits.
 I decided after the last batch of kits to have three sizes and price points; small, medium, and large, which does not refer to size but to content.  And, on occasion, I might break out and super size one or two!  Each kit is themed and color coordinated as well as packed full of goodies: paper packs, fabric, lace/ribbon/trim, embellishments, fibers, images, etc.

I hope to make a few of these up as monthly listings.  I thought I could do it weekly and maybe once I get the hang of the gathering, photographing, downloading, editing, uploading, blog posting, shop listing, and pre-packaging thing then I might be able to do it more often.  In between that time I hope to make some new art to sell.  I'm starting off with this little baby step. 

New listings include a Naturalist Melange Mixed Media Kit... 
 Victorian Opulence Mixed Media Kit...
 Sepia Dreams Mixed Media Kit...
 and Child's Play Mixed Media Kit...
These are just some sneak peeks at the kit contents to view all photos and kit content listing visit my new shop, Quill Cottage, on Etsy!

Thank you all so very much for your encouragement and support!
In celebration of my new shop opening I am planning to host a give away so stop back by next week for details.

Have a blessed and beauty filled day!
Related Posts Widget for Blogs by LinkWithin