HomeARTWordsStudioTutorialsClassesShop

Monday, December 28, 2009

A Wee Break and a HAPPY NEW YEAR...

"Glory to God in highest heaven,
Who unto man His Son hath given;
While angels sing with tender mirth,
A glad new year to all the earth."

~Martin Luther~

I will be taking a wee blogging break this week to spend time with my resident Handy Hubby. Today we are driving up to my grandmothers home, well, I guess it is mine now, to check on things and start a list of things we need to do a little updating. I will get to stop in a most the most delicious flea markets along the way to and from so I hope I find some goodies to share with you next week.

I have the background of a new art piece on the work table...I hope to have it ready to list in the shoppe next week!

And I hope that each and every one of you have a bright a blessed New Year!

Blessings,
Miss Sandy

Friday, December 25, 2009

MERRY CHRISTMAS...

"Great little One! whose all-embracing birth
Lifts Earth to Heaven, stoops Heaven to Earth."
~Richard Crashaw~


"For unto us a a child is born, unto us a son is given, and the government shall be upon his shoulder: and His name shall be called Wonderful, Counsellor, The Mighty God, The Everlasting Father, The Prince of Peace."

~Isaiah 9:6~

In case you missed it, you can read my Christmas devotional here:
CHRISTMAS IS LOVE!

Merry CHRISTmas!

Blessings,
Miss Sandy

Thursday, December 24, 2009

FINISHING TOUCHES.....

"Christmas - that magic blanket that wraps itself about us, that something so intangible that it is like a fragrance. It may weave a spell of nostalgia. Christmas may be a day of feasting, or of prayer, but always it will be a day of remembrance - a day in which we think of everything we have ever loved."

~Augusta E. Rundel~
Merry Christmas eve to you all. All is quiet here at the Quill on this dark and rainy morning. The world outside my window is hushed with whispering wind and the comforting sound of pattering rain drops. A chill is in the air tinged with excitement and anticipation, Christmas is almost come!

I am puttering at putting the final touches on my meager holiday fare in hopes that the celebration of the Christ Child will soon be here. No stockings are hung by my mantle with care this year, a first in 28 years. Happily there are also no tears.

Our first round of guests are scheduled to arrive at three but with the flooding weather it may only be Handy Hubby and me.

Speaking of finishing touches, I just have to show you what finishing touches Lorrie of Paper, Fabric, Thread has been up to. She used the little paper bird pattern from my last post and made these darling package toppers complete with little paper bag nests. These are so adorable! Lorrie, I love your twist on this project and your packages are beautiful.I have made my list and checked it twice, none were naughty, all were actually pretty nice, so presents are wrapped and under the tree...Dreamy creamy linens await to be ironed by me...
Gold and white will my table delight...
A centerpiece I am trying to get just right...
Creamy cones will grace cups filled with a spicy nutty fare...
Bags of almond pretzels, bowls of fantasy fudge, and bonbons of coconut and peanut butter are resting everywhere (recipes here)...
A big bowl of Christmas missives make my heart smile at all the warm thoughts and wishes contained there...
Kenny G's Miracles CD sets a soft background as candlelight softly twinkles...
Mary, Joseph, and I await the arrival of the baby Jesus...
Christmas would not be Christmas without the anticipation of miracles.

Now, I tell you what would be a real miracle, if just one Christmas came and went and I did not forget something important. Yes, one toy has no batteries and all those sweet treats littering my kitchen waiting to be delivered ~ no trays! Fingers crossed that Dollar Tree still has some of those white plates with the red trim around the edges.

So, yes, among all the last minute busyness I will slip and slide into town with a happy heart and nary a frown for Christmas has come to home and heart. I am praying in this new year that that deep abiding joy will not depart but that the miracle of that long ago Christmas day will daily visit me filling my heart with joy and glee. May you all share in my Christmas prayer, to place Christ at the center and to keep Him there.

Have a blessed Christmas Eve!

Blessings,
Miss Sandy

Tuesday, December 22, 2009

Christmas Ornament Tutorials...

"A Christmas candle is a lovely thing; It makes no noise at all, But softly gives itself away ."

~Eva Logue~

(Image from Karen's yWhimsy)

I know that Christmas is upon us and most of us have our Christmas crafting all done and are in the throws of baking and wrapping but I wanted to share a few ornament tutorials with you anyway. You can tuck these ideas away for next year or you might need a quick little last minute handmade gift or package topper. I'll add these to my tutorial link blog for easy access in the future. You can access all my tutorial links by clicking on the little birds nest on my sidebar.
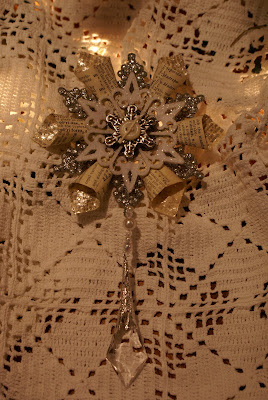
I had a request from Bonita (her blogs, here and here) and from Rose (her blog here) for tutorials on a couple of the ornaments I made this year and I thought I would share them with you in this post. My Vintage Paper Snowflakes were a huge hit this year and I thought you might like to make some too.I am also sharing the process for the ornaments on my tree which are all pretty quick and easy. Some of the instructions do not include step~by~step photos as is the norm here but, I did not photograph them as I made them and I don't have time right now to make up samples showing the steps. If anything is not clear, just email me or leave a comment and I will try to clarify for you.

VINTAGE PAPER SNOWFLAKE ORNAMENT:
MATERIALS (needed per ornament):

*Plastic Glitter Snowflake
*6 to 12 ~ 1 1/2 inch squares of vintage paper such as sheet music or book pages NOTE: The amount of squares per ornament depends upon if you want a 6 pointed or 12 pointed snowflake.
*Mini clothespins
*1 inch paper or card stock circle matching the color of your snowflake

*6 inches of 24 gauge wire
*Beads of your choice, I used a mixture of vintage, plastic, and glass
*Embellishments of your choice
*Clear drying glue
*Hot glue and glue gun
*Glitter
*Ribbon for hanging
INSTRUCTIONS:

*Curl paper squares into small cones, run a bead of clear drying glue along one seam, fold edge over and hold for a moment to let glue take hold. Pin mini clothes pin to the glued seam to hold it until it dries. Repeat of as many cones as you need for your ornament.*Using your 6 inch piece of wire, bead and wire a dangle for your snowflake.
*Wrap wire around one tip of snowflake a couple of times.
* Bring wire end around to the back of the snowflake and bend and smooth towards the center of the snowflake. Add a generous bead of hot glue to the center of the snowflake right over the end of the wire and place the 1 inch round of matching paper or card stock on top of the glue, hold in place until glue sets. This will not only secure the wire but finish off the back of your ornament nicely.
*Flip ornament over and straighten dangle end.
*Using the snowflake tip directly across from the dangle end, thread your ribbon tie through the openings on either side of the tip, knot, leaving the long ends loose for tying onto the tree. Be generous with this ribbon using at least 18 inches, ends can always be clipped if needed.
*Remove clips from paper cones. Each plastic snowflake has 12 points, this makes laying out your paper cones very easy, for a 6 pointed star just hot glue six cones to every other point as shown below:
For the 12 point snowflake, layout as below:*Brush clear drying glue inside each cone tip and glitter. You can glitter all your cone tips before assembly if desired.Now for the fun part!

*Embellish the center of your snowflake in any way you wish.
Enjoy!

In the sample below I used a snippet of vintage crochet lace, a crepe paper rosette made from very old crepe paper, and a vintage look felt flower embellishment. These snowflakes not only look stunning on a tree or in a garland but make pretty package toppers too! That is why I don't have any on my tree, they will be on top of packages under it.What else can you do with tiny paper cones? By inking the edges and folding down one corner before assembly you can make tiny cones like these:I added a tiny wire handle by hot gluing it to the inside of the cone sides, added a snippet of real moss and tiny paper punched bird (Martha Stewart Paper Bird Punch) to the "nest", finishing it off with a vintage shell button and a pearl bead to the tip. I will glue these onto place cards for my table setting!

MISC. ORNAMENTS USING VINTAGE GLASS BALLS:
For my tree ornaments I made a variety of styles using vintage glass balls as the base. I found a bag of 63 balls for $2.50 at a flea market and decided to repuropse some of them. The first step to using them was to remove the chipped cracked paint so that anything I glued to them would stick and give way with the loose paint.

To remove the color from old Christmas balls, place them in the sink and run cold water over them. The paint will loosen and slide right off. I only did this with those garish royal blue ones, I just don't like them so they got used in these projects. The paint comes off and you are left with a shiny silver mercury looking ball, great to use as is. Allow to air dry completely before embellishing.

LEATHER LOOK ORNAMENT:

You will need:
*Masking Tape
*Paper Towel
*Brown Shoe Polish
*Embellishments of your choice

Getting started:
*Tear off pieces of masking tape and begin taping the ornament with the jagged edges covering any straight edges. Tape the whole ball and burnish the tape down.

*Using paper towel, rub brown shoe polish all over ball.

*Glue on ornament cap and embellish as desired.

CHENILLE ORNAMENT:
You will need:
*Chenille Yarn
*Hot glue & glue gun

Getting Started:
*Start at the top of the ornament by adding a bit of hot glue to secure the yarn end.
*Continue adding glue and wrapping yarn until whole ball is covered.
*Glue on ornament cap.
*Embellish as desired.

HAMMERED FINISH ORNAMENT:
You will need:
*Hammered Finish Spray Paint ~ I used RUST~OLEUM Copper Hammered
*Clothes hanger
*Twine

Getting Started:
*Tie no more than three ornaments to a clothes hanger with twine.
*Following paint can directions, spray ornaments.

NOTE: These ornaments will drip a bit, do this outside in a well ventilated area. I hung mine in a tree and dabbed the drip on the bottom with a paper towel to remove excess. Allow to dry completely.

*Clip twine and remove ornament from hanger.

*Glue on ornament cap.

*Embellish as desired.

GLITTERED TATTERED ROSE ORNAMENT:
You will need:
*Cream colored spray paint
*Clothes Hanger
*Twine
*Clear Drying Glue ~ I used Matte Gel Medium
*Glitter
*Paint brush

Getting started:
*Tie no more than three balls to a clothes hanger with twine. Spray paint them with the cream paint in a well ventilated area. This might drip too so you might want to do these outside also. Allow to dry completely.

*Glue on ornament cap.

*Dab gel medium on one half of the ornament kind of thick and glitter. Allow to dry and then repeat for the other half of the ornament.

*Embellish as desired.

NOTE: To fashion a tattered muslin rose, follow the directions for making a ribbon rose HERE, only use a torn strip of muslin. I rubbed brown ink over the tattered edges to antique the rose. For the leaves on this one I used some silk wedding floral leaves. I inked them all over in brown ink then brushed on gel medium and glittered with mica flakes.

GLITTERED ORNAMENT:
You will need:
*Matte Gel Medium
*Paint Brush
*Glitter

Getting Started:
*Dab gel medium on one half of the ornament kind of thick and glitter. Allow to dry and then repeat for the other half of the ornament.

*Glue on ornament cap.

*Embellish as desired.

VINTAGE PAPER COLLAGE ORNAMENT:
You will need:
*Vintage paper scraps
*Matte Gel Medium
*Paint Brush
*Tissue Paper

Getting Started:
*To make working with the ball easier I glued on the ornament cap first and allowed to dry. Then I inserted a wooded skewer into the ornament opening and taped it securely, inserting the skewer into a block of foam to hold it while I worked.*Tear small pieces of tissue paper.
*Spread glue over section of ornament and place tissue paper over it, lightly brushing more glue onto it to stick it down. Repeat process until whole ball is covered. Allow to dry.NOTE: You are building a base with this step so that your vintage papers will stick, otherwise they will slide all over the place and not stick well.*Once ornament is dry, repeat gluing process only this time apply your vintage papers in a random fashion until whole ball is covered. Allow to dry.
*Embellish if desired.

MUSLIN STAMPED RIBBONS:
I hung all these ornaments with hand stamped torn muslin ribbons. To make your own ribbons you will need:

*Muslin
*Scissor
*Ink Pad
*Rubber stamps of your choice
*Old press cloth
*Hot dry iron ~ cotton setting

Getting Started:
*Determine the length you want your ribbons to be and cut your muslin to that length.

*Make a small snip near both of the outside edges with a scissor and rip the muslin leaving a raw edge.

*Begin by inking your stamp and stamping a row of your chosen image down the length of the muslin.*Leave a small gap and repeat stamping process until you have as many rows stamped as you need for ribbons. Allow ink to dry.*Cover stamped images with an old press cloth and iron to heat set the ink with a dry iron on a cotton setting.

*Snip between each ribbon row with a scissor and then rip the fabric to create your ribbon.
*Remove any excess threads

*Place ribbon strips face down on press cloth and press out rolled edges.Use your custom stamped ribbons on ornaments, to tie up packages, or to add to your artwork.

PAPER BIRD COLLAGE ORNAMENT:I added a few of these quick easy paper birds to my tree and thought you might enjoy them too. I am giving you patterns in two sizes, large and small birds.

As I am working on projects I keep a piece of brown tag board handy and when the scraps pile up I grab a glue stick and randomly glue them down until I have the whole page covered in scraps. It looks like a hot mess! That is what I used for the back ground of my little paper birds. You can use plain, printed, or vintage paper, what ever you wish to make your flights of fancy.

*Print out Bird Pattern on card stock and cut out pattern pieces.

*Trace onto card stock.

*Spray glue back side of tracing and apply to your choice of paper and cut out.

*Glue mirror image of birds together being sure printed paper sides are out.

* Spray glue back side of tail and wings and glue to printed paper of your choice and cut out.

*Punch hole where indicated on the pattern and snip on lines where indicated on pattern.

*Thread string, twine, ribbon, etc. through hole for hanging bird.

*Fold bird tail and wings in half and insert into slots.
*Dab hot glue to wings and tail near slits and hold until glue is set.

*Curl wings out a little and embellish as desired.

NOTE: If you want all the bird parts edges inked, do so before assembly on front and back sides of pieces.

NOTE: To save patterns to your computer, click on photo to enlarge. Right click on enlargement and choose, "save image as" to save to your computer.

LARGE BIRD PATTERN:

SMALL BIRD PATTERN:
OK, that's all I have for you today! I have a center piece that has no center so I need to get that figured out so I can finish wrapping gifts. I hope your day is merry and bright!

Blessings,
Miss Sandy
Related Posts Widget for Blogs by LinkWithin