


LITTLE BY LITTLE.
"Little by little," the acorn said,
As it slowly sank in its mossy bed,
"I am improving every day,
Hidden deep in the earth away."
Little by little each day it grew;
Little by little it sipped the dew;
Downward it sent out a threadlike root;
Up in the air sprung a tiny shoot,
Day after day, and year after year,
Little by little the leaves appear;
And the slender branches spread far and wide,
Till the mighty oak is the forest's pride.

I have been watching the trees beyond my windowed world ready themselves for their long winters sleep. The process is amazingly beautiful as brilliant greens fade to subtle yellows, soft golds, vibrant oranges, blazing reds, and cozy browns. Here at the Quill a variety of oak trees stand sentinel offering not just brilliant color but much needed nutrients in the form of acorns for native wildlife.

I am always inspired by elements of nature, the ripening acorns were the subject of my latest experiment in autumnal decor. While browsing in a high end shop for ideas I saw these amazing over scaled acorns that were covered in natural materials. I flipped the price tag over and gasp, $22.00 for one acorn! Yikes! Time to get crafty! The result is the following free tutorial, enjoy!

MATERIALS:
Plastic Eggs (size is personal choice)
Spray Paint (a gold, brown, copper, or tan)
OR
Paper Mache Eggs (size is personal choice)
Glues: hot glue, Aleene's Tacky Glue, Golden or Liquitex Heavy Matte Gel Medium
Natural Fibers such as jute, twine, wool yarn, heavy string, etc.
(I used jute rope, natural sisal, bamboo yarn, a nubby natural cotton yarn, and chenille yarn)
Scissor
Nature finds such as twigs, pine cones, acorn caps, tiny pebbles, shells, moss, lichen, etc.
Reindeer Moss (purchased from the craft store)
Optional embellishments such as beads, buttons, pearls, etc.
Glitter in copper, brown, or gold (optional)
INSTRUCTIONS:
If using plastic eggs:
Open egg halves and spray paint with your choice of base paint, allow to dry thoroughly. This base coat will keep the neon colors from showing through on your final product.


If using paper mache eggs base painting is not necessary.
Glue eggs closed by running a bead of Aleene's Tacky Glue around the center and snapping the egg shut, wiping away excess glue, allow to dry.


Apply Aleene's Tacky Glue to pointed cone end of egg and wrap with your choice of fiber. Apply a dab of hot glue to the end and snip off the excess. If using a plastic egg cover the other end of egg with fiber as described, this will ensure the moss and embellishments sticking in later steps. Put eggs aside to dry. If using paper mache egg there is no need to cover both ends, the hot glue will stick to the paper egg.


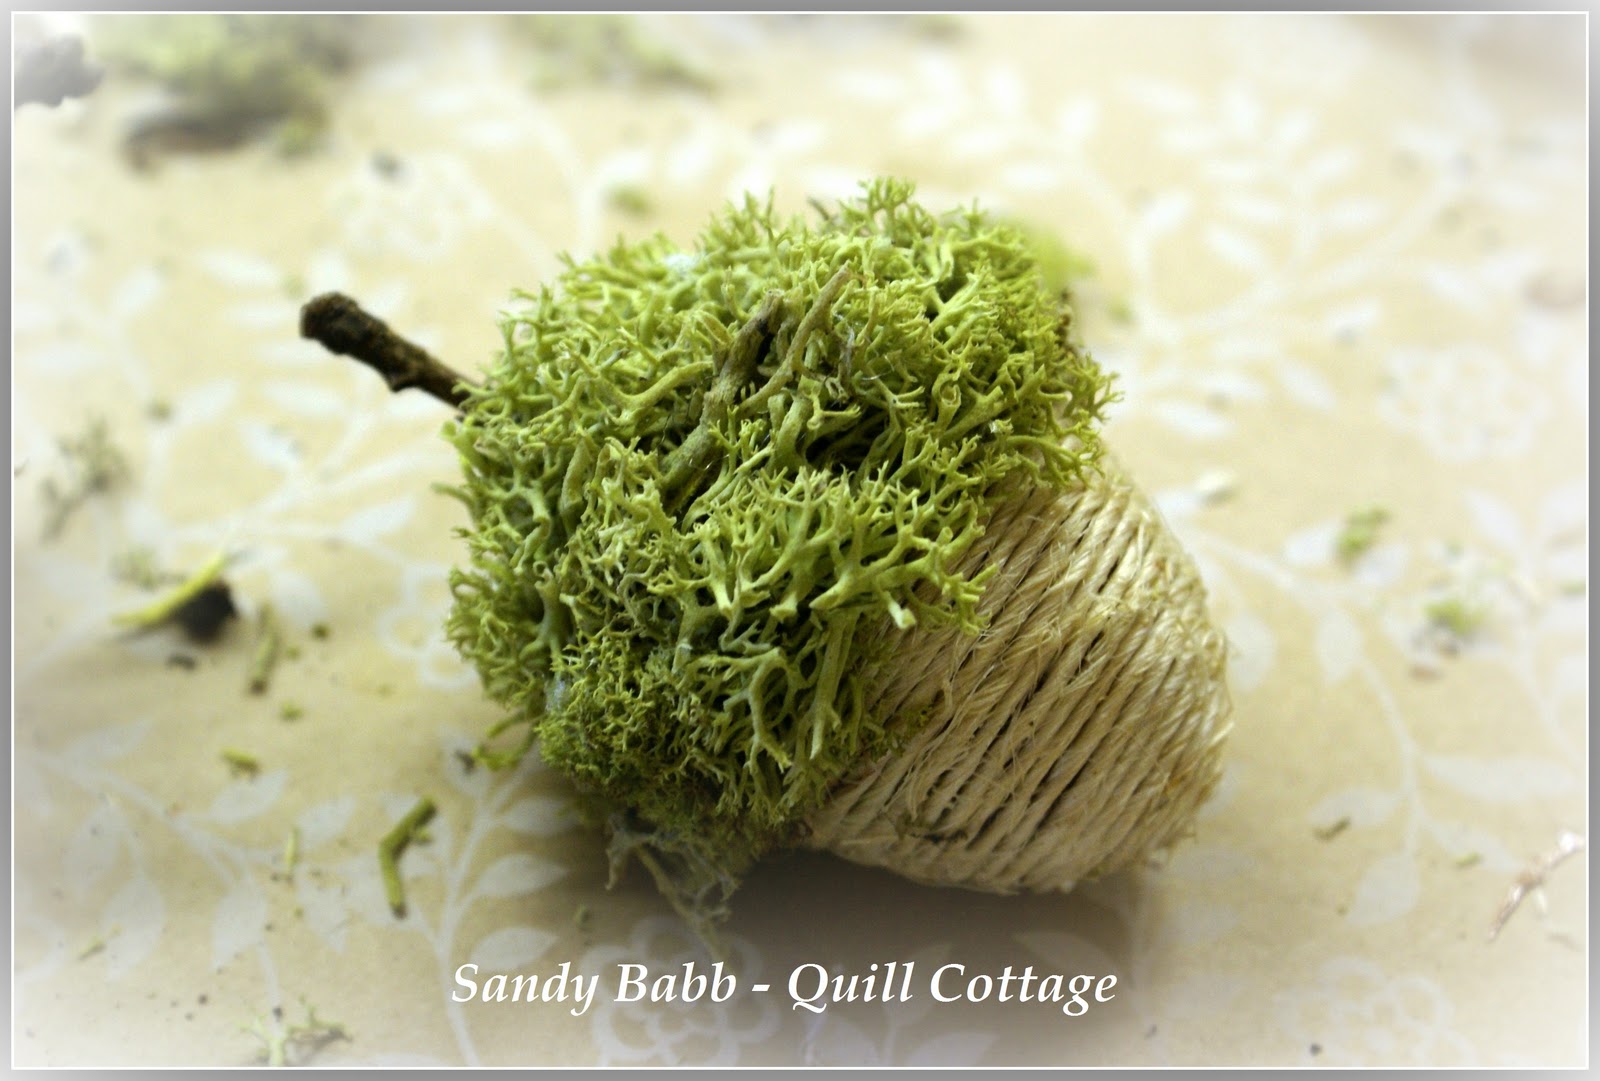
Hot glue Reindeer Moss onto top rounded end of egg to create a "cap".


Snip off a twig and glue to top center of moss to create a "stem".


Embellish your moss "cap" with nature finds by hot gluing in place.

I made some twig "coins" to embellish some of my faux acorns by cutting some 1/2 inch diameter sticks. I then sliced the stick into 1/4 inch slices using a band saw.


Other embellishment suggestions:
Pull apart a pine cone and hot glue the pine cone tips into the moss creating a random pattern...


Wrap the upper half of the egg in fiber and leave the painted end exposed, glue on moss and twig, then stud with real acorn caps...

Perhaps you would like to leave them plain...
Or stud with small sea shells...

Pretty pearls...

Lichen...

Dried flowers...

Beautiful buttons...

Pebbles...

Maybe glam and sparkle is more your style, use Heavy Matte Gel Medium on half of egg and glitter, allow to dry, wrap upper end in fiber and hot glue on moss "cap" and twig "stem", then embellish away!


Here are a few finished ideas:


If you would like to add more handmade items to your autumnal decor collection check out previous free photographed step-by-step instructions and patterns for Fabric Pumpkins, Mini Fabric Acorns, and Paper Skeleton Leaves.

Please feel free to save, copy, paste, or print this tutorial for your personal use.
Have a wonderful day!
Blessings,
Sandy
27 comments:
So adorable! Yesterday, I went looking for acorns on the side lawn where they usually are. There were none. Now I'm wondering if acorns come in cycles. We had gazillion last year. But I do have Easter eggs. Somewhere.
Sandy! So glad you're back generously giving of all your crafty and inspired thoughts! What a delightful tutorial - I totally had to pin this for future reference. I have tons of these eggs and love the fall colors more than the distracting neons - and now I know something new they can do!!
Joy!
Kathy
Amazing!! They are fabulous!
Wonderful tutorial! So creative.
Love these, Sandy! This would be a great project for young folk, too!
You always do the BEST tutorials! Thanks so much for sharing - these are really cute!
These Acorn's are so great and so many different ways to make them.
Thanks for all the ideas!!
Debbie
xoxo
What a creative way to use those plastic Easter eggs!! Love your creativity!! Thanks so much for taking the time to share your "how to", you are so sweet. Have a wonderful day.
Hugs,
Robin
Very creative, wow, I just love them, hope to give this a try :)
Dear Sandy,-
your tutorials are alwayes wonderful-and this one is so creative and the acorns so very beautiful.
Thankyou so very much for sharing- I also saw your older one- with equal beautiful creations.
Hugs,Dorthe
Look who's back! :-) So nice to see you, Miss Sandy! And with such a delightful project!
I hope all is well, injuries gone, sadness in the past...although I'm sure there are things weighing on your heart...some things do have long term holds on us...it's the nature of being a good person with deep feelings for others...which is what you are.
Blessings to you, my friend.
Diane
Your acorns are precious. Lots of details that truly make them unique and special. Thank you so much for generously sharing your techniques. Amazing Autumn to you...
Love your tutorial, Sandy! Thanks so much for sharing your inspiration and techniques.
xoxo
Donna
Sweet tutorial! And the other ones are great too! I love the look and colours you used! :D
Hugs,
When I was looking at pinterest this morning I kept seeing pins of your acorns...decided I'd come take a look at your blog. So glad I did...this is a wonderful post. Thank you so much for the tutorial! I'll visit again!
Oh my gosh! These are beautiful! You are so creative! Thanks for sharing! :)
Sandy, HOW DARLING!!! YOU are so CLEVER! Thank you for sharing. I LOVE these. In fact, if you don't care if I borrow one photo... I want to share & pass on your tutorial for others to find. Is that OK? Of course I will LINK to you.
I am so far behind in blog reading. I have been so busy & hubby has been home a lot. He seems to be an attention HOG! But, he's about to get really busy so that's OK! I need to read to catch up with you to see what's been going on in your world. I miss you. HUGS!
Charlene
So many variations and they are all AMAZING! I'm definately trying my hand at these...Thanks so much for sharing. Hugs,
Thanks for another wonderful tute...Well this is on the to do list... These are simply great... Of course I have to get my turkey wall hanging done first... Cheers. LJ Also sorry about signing in anonymous but that is the only way I can sign in and I dont know why it isnt taking my google account, something about cookies which I cant figure out how to fix.
I haven't been commenting because I couldn't figure out how it worked. I love the post, food for thought. I hope you are having a wonderful fall. I always love coming here, Big hugs, Mary
Hi Sandy,
I love your tutorial of your clever acorns! Such great ideas. I love using nature in art, there's nothing better.
Hope all is well with you.
Blessings,
Sonya
These acorns are so adorable!
You are so incredibly talented! So many different ideas, each one more charming than the last. I love them all!
Fabulous post, thanks so much for sharing.
Patti
Lovely tutorial and idea. Welcome back!
These are great. What a wonderful Idea, thank you for sharing it. Your blog is beautiful. I am relatively new to blogging but would love you to come by my site and give me input. You can even follow me--if you want to :)
Hope to talk to you again.
Faye
Hi sweet girl!!! How in the world did I miss this WONDERFULNESS??!! You never cease to amaze me with your precious creations and these are beautiful to me!!! I hope you are doing wonderful dear friend, sending you big hugs and much love, Dawn
I am a newbie to your sight and love it those are the cutest darn acorns! Anyways I searched youor blog and well didnt see where I could subscribe email to your posts would love to know how to get on the list
Post a Comment