I trust that all of you who celebrated the Thanksgiving holiday are sufficiently stuffed with turkey and all the trimming and still enjoying the leftovers. I have been feasting on studio leftovers these past few days and have come up with some simple recipes for easy holiday crafting using up the tidbits from previous projects.
One of the things I do when I am working on a project is to keep a "leftover" bowl near where I am working. This is where I deposit snipped string, paper or fabric trimmings, ends of ribbon or lace, the odd stray embellishment that I pulled out and was just not quite right for what I was working on, etc. This is a great place to snag that perfect morsel for embellishing or finishing off a project or to create tags with. I decided to give myself a challenge and see what I could make using what was in my leftover bowl.
With Christmas just around the corner I thought holiday themed items would make for tasty crafting. Meager fare but it worked!
CHRISTMAS TREE TAG TUTORIAL:
(Please feel free to save or print this tutorial for your personal use)
(Please feel free to save or print this tutorial for your personal use)
MATERIALS:
* 2 inch by 2 inch paper squares, you will need three squares per tree
(I used vintage sheet music, if using vintage paper make sure it is not brittle)
* Scotch Tape
* Craft Glue - (I used Aleene's Tacky Glue)
* Scissors - Regular straight edge and Pinking Shears
* Chenille Stem
* Glitter - (I used Martha Stewart Crystal Fine Glitter)
* Rubber Stamp of your choice
* Brown Ink or color of your choice
* Standard Size Shipping Tag
* Muslin - Torn slightly larger than your shipping tag
* Scrap Fabric and Lace
* Misc. Embellishments of your choice
TREE INSTRUCTIONS:
* Trim paper of your choice into 2 inch by 2 inch squares, three per tree. A scrapbooking paper trimmer makes this job quick and easy. Some paper suggestions are sheet music, book pages, wrapping paper, scrapbook paper, even wallpaper.
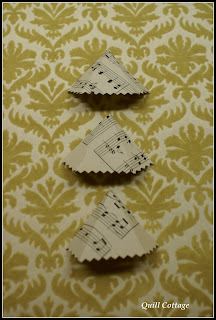
* Lay your paper squares in a diamond shape and fold the left corner of your diamond to the center and crease, repeat with the right side, with a pinking shear, trim off excess edge making sure to trim a bit of the front edge off also as shown below:
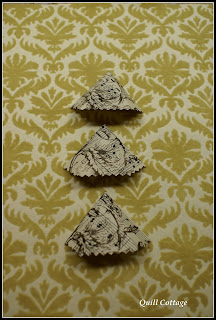
* Open up triangles and lay flat, rubber stamp with your choice of stamp and ink. I used a swirly design and brown ink.
* Secure the back of each triangle with a small piece of Scotch Tape.
* Using the same ink as you stamped your design in, ink all the outside edges of each triangle.
* Using craft glue cover the front and back tip of one triangle with glue, insert into cone end of another triangle leaving about 1/4 of an inch showing below the first cone, press to secure, repeat with the third cone. Insert Chenille Stem into bottom cone until it touches the top tip, determine the length of "trunk you want showing and clip with a wire cutter, remove, cover one end with craft glue, reinsert and allow tree to dry.
* Embellish and/or glitter tree as you desire. I covered my tree with Martha Stewart Crystal Fine Glitter and glued a small pearl on the tree top.
TAG INSTRUCTIONS:
* Tear muslin into rectangles slightly larger than your shipping tag.
* Lay strips of torn fabric or scrap laces across your muslin backing. I chose to place mine horizontally but you can also do this vertically or in a random pattern. You have three options for adhering your fabric strips to your backing:
* Use and iron on adhesive following the manufacturers instructions - This is the method I chose to use:
* Use a clear drying craft or fabric glue such as Fabri-Tac or Aleene's Tacky Glue
* Use a sewing machine to sew them on
Once you have secured your fabric and lace to the backing you are ready to assemble the tag.
TAG ASSEMBLY:
* Optional Step: If you are going to do any inking, dyeing, stamping, or embossing to your shipping tag or want to add any kind of decorative paper to the back side, or if using this as a card inscribe your message, do this before assembly begins.
I inked the edges of my shipping tag, stamped and signed it, then ran it through my Cuttlebug with an embossing folder before assembly. I also did a simple sewing machine zigzag stitch around the edge of my fabric base:
* If you are going to replace the string that comes on the tag with another fiber or ribbon do so now.
* Using a craft glue, glue fabric backing to front of your shipping tag.
* Using a craft glue, glue tree in place.
* Further embellish and trim as desired. I added a little Christmas message, buttons, a paper ruffle, and a tad of lace. (Please note you are looking at a wet tag below so you will see some glue spots but they will dry clear, I forgot to have a completed sample to show you!)
These make wonderful gift tags to top your gifts, tree ornaments, or even Christmas cards, just write your Christmas greetings on the back of the tag.
I hope you are not tired of leftovers because over the next couple of posts I will have more scrappy appetizers to whet your holiday appetite!
I am linking to Funky Junky Interiors
Have a wonderful day!
I am linking to Funky Junky Interiors
Have a wonderful day!


9 comments:
Love your tag Sandy and since you are using up scraps, I love the idea even more! Thanks so much for sharing your tutorial. Have a great week.
Hugs,
Robin
Sandy, this is a sweet tag! I love it - if I have some time before Christmas, I hope to make a few of these for special gifts! Thanks for sharing~~~
Darling! I can see them all over my undecorated tree. I can see it, but it's not going to happen. Maybe one.
Hi Sandy,
Your tag is adorable and love the fact that you used scraps. I have plenty of those! Thank you for the tutorial!
Have a wonderful week~
Sonya
Dear Sandy, it is adorable, I love the little "skirt" you added ,and the great way you make the tree stand up, and "live"-
Thankyou for so kindly posting your tutorial for us to create this wonderful tag, too.
Hugs and x
Dorthe
Very cute and what a great idea for scraps!
This is a stunning idea!!! I adore what you made out of essentially nothing! SWEET!
Hugs,
Thank you for this easy-to-follow tutorial. I love the finished tag! Your blog is just lovely. I will definitely be back again. Amy :)
Love the embossing idea on the luggage tag sandy, looks great and great tutorial! Thanks for sharing, Hugs Marilou
Post a Comment