


I got this really sad sort of tree this year, this is a story for another day, and I wanted to transform it from sad to spectacular. I also wanted everything on the tree from the garland to the ornaments to be unique and handmade. In previous posts I have shared some of the ornament tutorials and here is my new garland. I adore it! I was thinking this is not only a great holiday idea but I could so imagine this as wedding decor too. Who knew wax paper and cupcake and candy liners could be so elegant?
Hang on to your hats as I breeze you through the step-by-step process below!
Hang on to your hats as I breeze you through the step-by-step process below!
Please feel free to save or print out this tutorial for personal use only.
MATERIALS:
NOTE: The tutorial below will make a 100 light garland, this is perfect for a five foot or under tree.
* White Gift Tissue Paper - I used two .99 cent packages with 10 20" x 20" sheets purchased at Hobby Lobby
* Sewing Machine, thread and bobbin to match tissue paper
* Scissor and Craft Knife
* Scotch Tape
*White Cupcake Liners - Standard Size
* One strand of 100 white lights with white cording
* White Card Stock
* Hole Punch
* Wax Paper
* Glues: Low Temp Hot Glue, Aleene's Tacky Glue, Aleene's Clear Tacky Gel, Heavy Matte Gel Medium
* Glitter - White
INSTRUCTIONS:
GARLAND FRINGE:
* Layer 10 sheets of tissue paper, cut into 2 inch strips, you will need 15 of the 2 inch 10 layers strips for a 100 light garland strand. It is easier to cut if paper is stacked and folded as shown below:

* Unfold layered paper strip and sew directly down the middle of the tissue strip as shown below, clip off end threads:

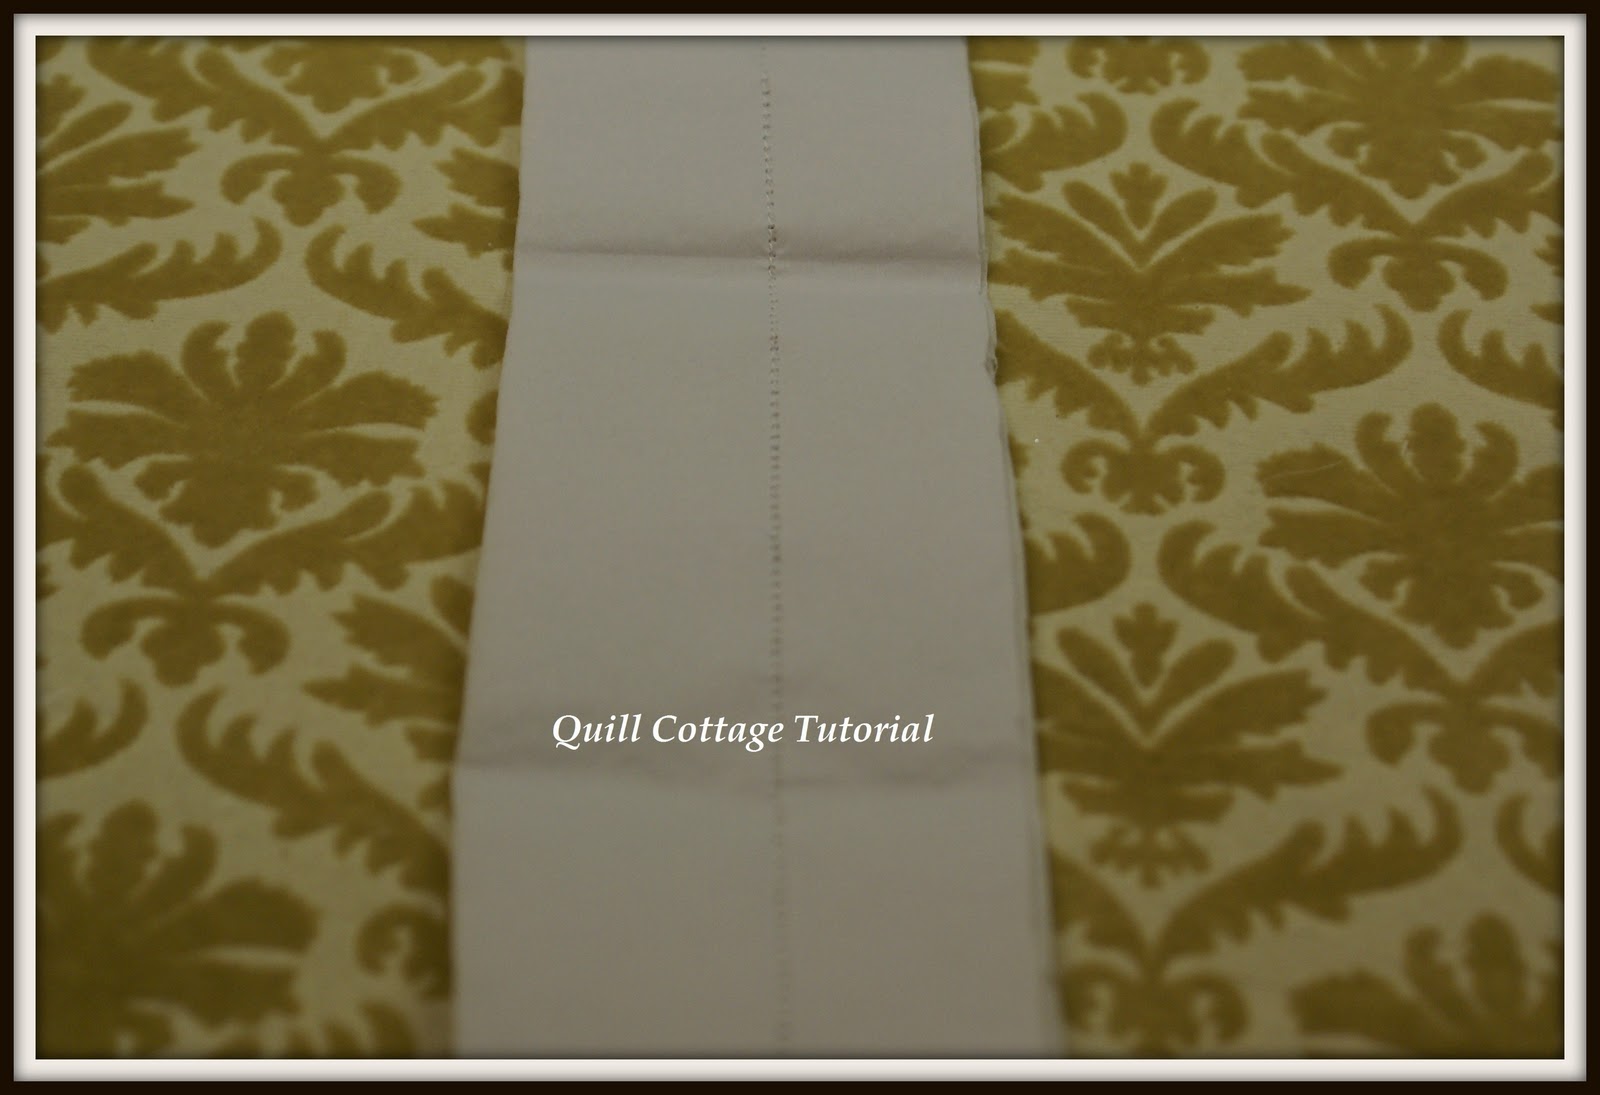
* Crease and fold strip along sewing line

* Snip through layers being careful not to clip through the stitching, just clip up to about 1/8 of an inch away from the stitching. Check out these scissors that make this so fast and easy! (Santa Baby are you paying attention? I want a pair of these in my stocking!)

* Unfold, hold end of fringe strip between your palms and roll it back and forth like you are rolling play dough, move down the strip until all the fringe fluffs out, repeat with remaining strips


* Set garland strands aside until final assembly
NOTE: This trim is great for trimming tags or party favors too!
PAPER GALSSINE FLOWERS:

I made the flowers a few at a time and placed them on the garland by eye, you will want to scatter them out and leave some lights plain. I ended up with 12 full flowers and 12 blossoms.
* Using white card stock, cut a 1 inch circle and a 2 inch circle per flower. I used a couple of paper punches that I had that were the right size, one was a flower shape and the other a scalloped circle, circle punches will save you much time when doing this project. Punch hole in center of each card stock piece

* With low temp glue gun, glue 1 inch card stock circle to bottom of small glassine candy cup and 2 inch circle to the bottom of white cupcake liner.


* Set small cup aside, using a scissor trim cupcake line into flower petal shapes, you want to have five to six petals, these do not have to be uniform

* Tear off about a 4 inch wide strip of wax paper, fold in half, cut out petal shapes along fold line then cut petals apart as shown below, repeat for as many petals as you will need for remaining flowers


* Hold wax paper petal between thumb and finger as shown below, with other hand, twist blunt petal end, release, petal should have formed around your thumb, repeat with remaining petals. For a 5 petal flower you will need 5 wax paper petals per flower, for a 6 petal flower you will need 6 wax paper petals per flower. (EEK! Put mani and moisturizer on Christmas list! I am not as old as these poor abused hands are making me look - any great tips to cure crafter hands?)


* With a low temp glue gun, glue wax paper petal between each petal on the inside of the cupcake liner


* Use a sharpened pencil to poke hole through cupcake line and candy liner bottom


* Using low temp glue gun, run a bead of glue around the outer edge of the small liner, line up the holes and glue inside the larger liner

* Using Aleene's Tacky Glue, spread glue around the small liner bottom avoiding the punched hole the sprinkle with glitter, once again twist the pencil in the punched hole to make sure it is glue and glitter free, allow to dry (I used mica flakes for my flower center)


* Using Heavy Matte Gel Medium, brush the tips of the wax paper petals and sprinkle with white glitter, this dusting looks like it is snow kissed, allow to dry


* Using Aleene's Clear Tacky Gel, run a bead of glue around the fluted edge of the mini glassine cup, coat with white glitter, allow to dry

ALTERNATE FLOWER PETAL:
* If you do not want or have time to do all the cutting and twisting of the wax paper leaves, use some white silk rose petals instead, just snip them off and glue them in place. This will give you a more solid looking flower while the wax paper ones will give you more of an iridescent illuminating look.

FLOWER BUDS:
* Using white card stock punch or cut out two 1 inch circles for each flower bud you make, punch a hole in the middle of each card stock shape. Using a low temp glue gun, glue one circle to the inside of the mini glassine cup and the other to the back of the cup making sure to match up the punched holes. Poke hole through center with a sharpened pencil


* Coat the inside bottom of the mini cup with Aleene's Tacky glue and glitter (I used mica flakes here also) Twist pencil in hole to assure that it is clear of glitter and glue

* Using Aleene's Clear Gel, run a bead of glue around the fluted edge of the mini glassine cup, dip in white glitter, allow to dry


* Once dry, use a craft knife to cut small slits around the punched out hole as shown below, this will allow the flowers to slip onto the lights easily and hold firmly in place

* Start at one end of your light strand and scotch tape the fringe around the end of the strand and wind the fringe loosely around and between each light taping the end when you reach it and taping the next paper fringe to it, continuing until you reach the other end of your strand


Finally I am ready to decorate the Tree!!!
I am linking to Funky Junky Interiors
 Happy Holiday Crafting!
I am linking to Funky Junky Interiors

8 comments:
What a brilliant gal you are! That garland is exceptionally beautiful. And thank you for the information on multi-blade scissors! Who knew?! Not I that's for sure. Happy creating!
Pretty Pretty, Sandy! How patient you are! I just don't know where you find the time to do all these lovely hand-made items!
Your creation is amazing, but I don't think I would have the patients to make that! You did a great job!
tot
How beautiful thank you for taking the time to do a tutorial!
I love the idea and thank you for the sweet tutorial! But with the amounts of lights I put on my tree Id have to make it for two weeks! LOL
Beautiful though! Thanks!
Hugs,
What a clever idea! I just love glitter! TFS
I love the idea great tutorial..
toronto limousine services
Sandy, it is a gorgeous garland, I love the fringe, and the glitter inside the flowers, which must sparckle when light is on :)
Thankyou so much for your generousity giving us so many "christmas" gifts. Your tree is beautiful with the garland.
Hugs,Dorthe
Post a Comment