 Welcome! Come on in. Would you like a cupcake? Or a candy cane?
 A cookie?
 Or perhaps a chocolate jungle bell?
 How about the two cent tour of the kitchen of Quill Cottage? If you have been a visitor before, just scroll on past this little leg of the journey. I am posting my kitchen as per a request from one of my dear readers. Remember, I live in a cottage and my spaces are itty bitty compared to most standards today. We have had to make the most of our small space so everything has to be really functional. This is almost the whole enchilada in one shot!
 My stove, that I love, love, love!!! It is my favorite flea market find. Above is a piece antique ceiling tin that I finished out in a nickle finish and Handy Hubby framed for me. Copper pieces accent the pot rack and a set of vintage pots rest on top.
 The sink where I can see the deer graze at the edge of the woods, cardinals in the bushes, or a perfect circle in the tree canopy to the sky.
 Here is my pantry, which used to be a hallway that we converted.
 I started to remove all the useful stuff like brooms and such, but I thought not, this is how we really live. The walls are fifteen light panel doors that I decoupaged recipes from the 1920's and 1930's over the glass panes.


 Back when my daughter was in youth group we used to have large gatherings here. One of the girls loved to hang out in our kitchen and especially the pantry. She would swing open the spice cabinet and inhale deeply. She said that this is her favorite room in my house. It smelled like home.
 This is the nook where the washer and dryer rest under the counter top. Here you can see that it is all decked out for entertaining.
 Swinging back around and there is my refrigerator. I hope you enjoyed the two cent tour!
 What is that, you only got a peek at the nook and its entertaining look? Sure, we can take a closer look. In this corner Nesting Santa's stand at the ready to guard the goodies that will soon fill the tired trays!
 In this corner Santa has filled his sleigh with a tiny tree full or white twinkle lights and tiny ornaments.
 In the center of the top shelf rests a little vignette of gingerbread men and a framed Christmas card of Santa napping. To the right and left of this display are framed pieces of handmade art.

 A festive garland filled with mini red and white kitchen utensils and gingerbread man stocking ornaments rings the counter top set off with a twinkling glow of white lights.
 Here is the whole thing!
 Now that we have taken a tour of the kitchen, why don't we make something! How about some of Miss Sandy's Christmas Candies and Cookies AND some of those cute little Gingerbread Men Stocking Ornaments? Sound good? Grab an apron and let's go!
 GINGERBREAD MAN STOCKING ORNAMENT TUTORIAL:
 MATERIALS:
*Cotton Fabric
*Fiber Fill
*Needle and Thread or Sewing Machine
*Scissor
*Paint ~ Red, White, Black
*Baby Booties
*Misc. embellishments and trims
*Hot Glue and Hot Glue Gun
INSTRUCTIONS:
*Draw or trace a gingerbread man head, arms, and body onto the wrong side of a 4" x 5" piece of fabric. Place over identical piece of fabric, right sides together. *Sew over trace lines by hand or with a sewing machine.
 *Trim away excess edges and snip at all corners to prevent puckering.
 *Turn and stuff with fiber fill.
 *Paint on eyes, nose, mouth, and frosting as shown in photo OR glue on beads, buttons, etc. as you desire.
 *Stuff fiber fill into the foot of baby bootie.
 *Place gingerbread man in bootie as shown in photo. On front and back, roll back bootie cuff and run a bead of hot glue along body, press bottie back in place.
 *Glue or stitch on a ribbon loop for hanging.
 *Add any extra embellishments that you desire. I bow ties added tiny cookies to the hands of mine. (Darling Daughter asked if that would be considered canibalism) Some have bells on the tips of the toes and I also added some vintage silver garland for a bit of sparkle.
This would be a great way to preserve a special memory of your child or grandchild by turning one of their little booties into an ornament for the tree!
Now that we are through crafting, let's get cooking!
FANTASY FUDGE
3/4 Cups butter
3 Cups sugar
2/3 Cups evaporated milk
1 pkg. (12 oz) chocolate chips
1 jar (7 oz) marshmallow creme
1 Cup chopped nuts
1 tsp. vanilla
Microwave butter in 4 quart bowl on high for 1 minutes or until melted. Add sugar and milk, mix well.
Microwave on high 5 minutes or until begins to boil, stirring after 3 minutes. Mix well. Scrape bowl. Continue microwaving 5 1/2 minutes, stir after 3 minutes. Stir in chips until melted. Add remaining ingredients, mix well.
Pour into greased 9" square pan for thick fudge or 9" x 13" pan for thinner fudge. Cool at room temp. then cut into squares. Makes 3 lbs.
PEANUT BUTTER CUPS
1 lb. margarine
2 Cups peanut butter
2 1/2 to 3 lb. confectioners sugar
3 tsp. vanilla
6 oz. semi-sweet chocolate chips (you may need a bit more than called for)
1/4 lb. paraffin
Cream margarine and peanut butter. Add sugar until the consistency to form into balls the size of large marbles. Add vanilla. Mix thoroughly using hands. Melt chocolate and paraffin in small double boiler. Dip balls in chocolate, using a toothpick. Place on waxed paper to cool. Remove toothpick and dab chocolate over hole. NOTE: candy freezes well. Yields 125 pieces.
CHOCOLATE COATED COCONUT BALLS
1 stick butter or margarine
1 can sweetened condensed milk
2 boxes powdered sugar
pinch of salt
1 small bag flaked coconut
2 pkg. semi-sweet chocolate chips
1/3 cake paraffin
Melt butter; add milk. Stir in sugar and salt. Add coconut. Chill until it can be easily handled. Roll into balls; insert toothpick in each ball. Refrigerate until firm. Melt chocolate and paraffin in a double boiler. Dip each candy into chocolate. Place on waxed paper to cool. Remove toothpick and dab hole with chocolate. Yields 70 pieces.
PECAN THIMBLE COOKIES
2 Cups all-purpose flour
1 1/4 Cups chopped pecans
1 Cup butter, softened
1/4 Cup granulated sugar
1/4 Cup firmly packed brown sugar
Process flour and pecans in food processor or blender until very fine. In a medium bowl, beat butter and sugars until light and fluffy. Stir in flour mixture. Wrap dough in plastic wrap and chill overnight.
Preheat oven to 300 degrees. On a lightly floured surface, use a floured rolling pin to roll out dough to 1/4 inch thickness. Use a thimble to cut our cookies. Transfer to a foil-lined baking sheet. Bake 10-12 minutes until very lightly browned. Yields about 50 dozen cookies.
VARIATION: Cookies may be rolled out as directed above and cut out using regular size cookie cutters in any shape you desire. Bake 20 to 25 minutes. Yields about 5 dozen 2 1/2" cookies.
I hope that you enjoy some of these family favorites!
Now on to the last bit of goodness I have tucked away for you here at the Quill, the winners of the Gingerbread Man Give Away!
#4 ~ Pattie of The Joy of Nesting! (time stamp: Dec. 18, 2008 10:26AM)
#6 ~ Vee of A Haven for Vee! (time stamp: Dec. 18, 2008 11:55AM)
#18 ~ Marmee of Things I Love! (time stamp: Dec. 19, 2008 7:19PM)
Congrats to you all! Please email me your addresses and I will get your package in the mail on Monday morning! Thank you to all who have visited during this holiday celebration here at the Quill. I hope you have enjoyed this month long celebration as much as I have.
I invite you to join me tomorrow for the last installment of our families Advent celebration. I have decided to postpone the winter table setting until after the holidays so be sure and pop over between Christmas and New Years to see what happened to those snowmen and mittens we made earlier. I will have a bit of something up for you on Christmas Eve if you should decide to drop by. I will be taking a one week break most of Christmas week. This little elf needs to get herself in gear to spread a little holiday cheer right here at home! I hope you all have a very Merry Christmas!
Blessings,
Miss Sandy
 WELCOME! I am so glad you could join me today for A Pretty Little Christmas Blog Party being hosted by Heather of Pretty Petals. Heather's invitation is to post on whatever makes your heart sing about your holiday celebration...from how you decorated your tree or a space in your home, a special something you made for the holidays, a pretty gift wrapped package for someone special, or even the beautiful snow outside...how you are having A Pretty Little Christmas! There are so many beautiful things for us to appreciate this time of year, it will be nice for us to take the day and enjoy them. There are many beautiful links for you to visit, just click on the highlighted "A Pretty Little Christmas Blog Party" link above and enjoy all the pretty ways Christmas is being celebrated! (click on any photos for detail viewing)
Also, Southern Hospitality is hosting Deck the Halls 2008 today too! Hop on over to visit Rhoda and all the lovely links! Just click on the "Deck the Halls 2008" highlight above to visit or to join in the fun!
This year my goal was to bring a fresh sense of togetherness to our family through vintage traditions and timeless decor. While making the most of decking the halls, trimming the tree, baking cookies, and wrapping the presents, I wanted a way to keep my focus on what this season of celebration is really all about ~ the birth of Christ. So come with me to share in some of our beloved old-fashioned holiday traditions as we celebrate the cherished season of Christmastide. This year I chose a room in our home to honor the true meaning of Christmas, our living room. It is here that we gather each evening as a family. This is the room one must pass through to get to all other rooms and I wanted it to be filled with the spirit of Christmas. On the antique farm table in front of the sofa rests our Advent Wreath.
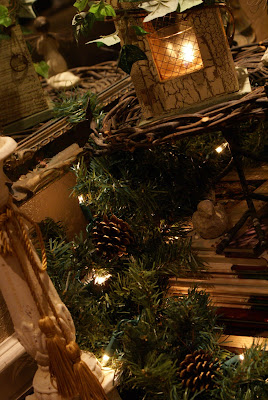
 Above the sofa is the first decoration we put out each year, our Nativity scene all nestled in boughs of green with soft white twinkling lights and a few pine cones tucked in here and there.
 The mantle is draped with garland and the stockings are hung by the chimney with care in hopes that St. Nicholas will soon be there!
 A small vignette rests on a narrow table near the hall.

 And the centerpiece of it all is the table top Nativity tree I created this year. I challenged myself to do this area without spending any money and by using only supplies I had on hand.
  This little tree usually lives outside during the holidays but I brought it in and placed it on a table that I draped with a heavy fabric. I had to do some creative folding, tucking, and pinning to get it to look like a custom table cover. More fabric was puddled under the iron tree stand. The table trim and fabrics are for sewing projects I have planned for after the holidays.
I handmade almost all the ornaments. There are paper stars with vintage Nativity scenes in the center of each, decked out with vintage buttons, trims, and tassels. (Paper Star Tutorial)

 Glittery paper ornament snowflakes grace the tree with vintage button centers and angels. (Glittery Paper Ornament Tutorial)
 Tiny sparkling banners with messages of "REJOICE" inscribed upon them remind us to be joyful for we have much to be thankful for.
 Buttoncicles glisten from the branch tips.
 Here is how to make your own:
 MATERIALS:
*Gold Wire
*Wire Cutters
*Small Clear Beads~1 per buttoncicle
*Pearl Beads~5 per buttoncicle
*Buttons~ 4 per buttoncicle in graduated sizes
*Large Gold Decorative Bead~1 per buttoncicle
INSTRUCTIONS:
*Cut a 10" piece of wire and sting on small clear bead onto wire, centering on wire, bend ends upwards. Refer to photos for placement if needed. *Thread wire ends through small button holes.
*Thread both wire ends through a pearl bead.
*Add another button.
*Add two pearl beads.
*Add another button.
*Add two pearl beads.
*Top with largest button.
*Add large decorative bead adding a dab of clear drying glue between bead and button to secure. Twist wire ends and form into a hook and hang on tree. Gluing is not necessary if you want to reuse your supplies.
 For garland I used some gold plastic beads that came in a package of items I previously picked up at a flea market for 75 cents. I also added a shabby chic vintage button and crochet lace garland.
  I sifted through my stash of vintage trims and pulled out pieces of lace. I overlapped the ends of the lace and placed a large shell button over the joint. Using a small snip of gold wire, I secured the button to the lace, locking the ends together by threading the button onto the wire, through the lace, and giving it a gentle twist on the back side. I can easily take it apart after the holiday.
White twinkle lights and large golden pears, also previously found in a flea market, round out the tree which is topped by a tarnished glittered star, which is an old ornament that I glued a ribbon to the back to tie it to the tree top. I love the way it turned out! There is no way I can't keep Christmas in my heart with all these festive reminders!
The main family memory tree rests in the entry all aglow with colored lights and equally colorful ornaments, each of which has a special story attached.  We can still enjoy it from the living room as it plays peek~a~boo through the candle screen.
  It warmed my heart to watch Darling Daughter and The Young Man Who Comes To Call On Her as they decorated the tree together. She related the tale of each ornament to him as is our family tradition. It's newest addition is a Nativity Tree Topping Star!
 In the guest bathroom angels are heralding in the new born King!
  A folk art angel I painted ages ago graces the center of the scene with a couple of smaller brass angels flanking a framed vintage Christmas card.
  The brass angels are ornaments that came in that same 75 cent grab bag. I twisted gold metallic pipe stems around a bamboo skewer and hot glued them to the top of the skewer. I used to small glass votive holders filled with floral foam to anchor them, covering the pots with the garland. Gold glass ornaments (one even depicts the wise men seeking the Savior), ribbons, a tassel, and a Charlotte Lyons inspired star and trees sparkle and shine!
 Glistening branches line up on the farm table in the dining nook awaiting being the stars of a wintry silver and white table setting.
  The "trunks" are hand blown etched frosted taper candle holders that I got on clearance at Target a couple of years ago. I softened some museum wax and placed it in the candle holder. I sprayed some small branches with white spray paint, sprinkling with a chunky white glitter while still wet.
  I misted on spray glue and used a finer glitter to cover the branches, securing them in the holders by pushing them down in the wax. I'll post the full table scape later this week or early next week.
Lastly is a little peek at Christmas in the kitchen. This is where traditional Christmas colors reign, red and green galore. Here is where Santa lives and Christmas kitchen magic is made with concoctions of candy, cookies, and cakes!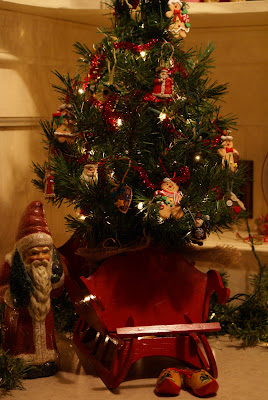 Here are a few sneak peeks, I plan on posting more on this room decor later this week and something fun will make its way in to the Give Away on Thursday, so come back to see!
 I have ended out tour in the kitchen which to me is the coziest room in the house because it is where I feed and nourish my family. At the heart of the kitchen where I spend countless hours, there is also a reminder of the manger resting on my kitchen window sill.
 I am reminded that Christmas is a birthday party for the King. As long as we are celebrating, why not partake in some Birthday cake? This is a family favorite and a fun tradition, making Scripture Cake. Scripture Cake is a delicious confection made only from ingredients mentioned in the Bible. One must decipher the mysterious ingredients, but Miss Sandy will help you out! My son and daughter loved doing this and would have a race looking up the Scripture and shout out the ingredients.
SCRIPTURE CAKE
1 Cup Psalms 55:21 (2 Sticks Butter)
1 Cup Jeremiah 6:20 (Sugar)
3 Jeremiah 17:11 (Eggs)
1 Tablespoon 1 Samuel 14:25 (Honey)
1/2 Cup Judges 4:19 (Milk)
2 1/4 Cups Leviticus 6:15 (Flour)
1 Tablespoon Amos 4:5 (Baking Powder)
2 teaspoons II Chronicles 9:9 (Spice Mixture: 1 teaspoon cinnamon, 1 teaspoon nutmeg)
A pinch of Leviticus 2:13 (Salt)
1 1/2 Cups 1 Samuel 30:12 (Raisins)
1 Cup Numbers 13:23 (Chopped Figs)
1/2 Cup Numbers 17:8 (Chopped Almonds)
Preheat oven to 350 degrees. Butter and flour a loaf pa.
In a large bowl, cream the butter with a mixer until light, beating in the sugar, a tablespoon at a time until fluffy. Add eggs, one at a time, beating well. Stir in honey and milk.
Sift together the dry ingredients: flour, salt, baking powder, and spices. Gradually add the dry ingredients tot he butter mixture, blending until thoroughly mixed. Stir in the raisins, figs, and almonds.
Turn mixture in baking pan. bake for 50 minutes.
This spicy savory holiday confection is sure to become a holiday favorite in your home too!
Thank you so very much for stopping by. I hope you have enjoyed your visit and viewing all the pretty little things that are making Christmastide special in our home. May you and yours have a very Merry Christmas this year!
Blessings,
Miss Sandy


 Welcome! Come on in. Would you like a cupcake? Or a candy cane?
 A cookie?
 Or perhaps a chocolate jungle bell?
 How about the two cent tour of the kitchen of Quill Cottage? If you have been a visitor before, just scroll on past this little leg of the journey. I am posting my kitchen as per a request from one of my dear readers. Remember, I live in a cottage and my spaces are itty bitty compared to most standards today. We have had to make the most of our small space so everything has to be really functional. This is almost the whole enchilada in one shot!
 My stove, that I love, love, love!!! It is my favorite flea market find. Above is a piece antique ceiling tin that I finished out in a nickle finish and Handy Hubby framed for me. Copper pieces accent the pot rack and a set of vintage pots rest on top.
 The sink where I can see the deer graze at the edge of the woods, cardinals in the bushes, or a perfect circle in the tree canopy to the sky.
 Here is my pantry, which used to be a hallway that we converted.
 I started to remove all the useful stuff like brooms and such, but I thought not, this is how we really live. The walls are fifteen light panel doors that I decoupaged recipes from the 1920's and 1930's over the glass panes.


 Back when my daughter was in youth group we used to have large gatherings here. One of the girls loved to hang out in our kitchen and especially the pantry. She would swing open the spice cabinet and inhale deeply. She said that this is her favorite room in my house. It smelled like home.
 This is the nook where the washer and dryer rest under the counter top. Here you can see that it is all decked out for entertaining.
 Swinging back around and there is my refrigerator. I hope you enjoyed the two cent tour!
 What is that, you only got a peek at the nook and its entertaining look? Sure, we can take a closer look. In this corner Nesting Santa's stand at the ready to guard the goodies that will soon fill the tired trays!
 In this corner Santa has filled his sleigh with a tiny tree full or white twinkle lights and tiny ornaments.
 In the center of the top shelf rests a little vignette of gingerbread men and a framed Christmas card of Santa napping. To the right and left of this display are framed pieces of handmade art.

 A festive garland filled with mini red and white kitchen utensils and gingerbread man stocking ornaments rings the counter top set off with a twinkling glow of white lights.
 Here is the whole thing!
 Now that we have taken a tour of the kitchen, why don't we make something! How about some of Miss Sandy's Christmas Candies and Cookies AND some of those cute little Gingerbread Men Stocking Ornaments? Sound good? Grab an apron and let's go!
 GINGERBREAD MAN STOCKING ORNAMENT TUTORIAL:
 *Sew over trace lines by hand or with a sewing machine.
 *Trim away excess edges and snip at all corners to prevent puckering.
 *Turn and stuff with fiber fill.
 *Paint on eyes, nose, mouth, and frosting as shown in photo OR glue on beads, buttons, etc. as you desire.
 *Stuff fiber fill into the foot of baby bootie.
 *Place gingerbread man in bootie as shown in photo. On front and back, roll back bootie cuff and run a bead of hot glue along body, press bottie back in place.
 *Glue or stitch on a ribbon loop for hanging.
 *Add any extra embellishments that you desire. I bow ties added tiny cookies to the hands of mine. (Darling Daughter asked if that would be considered canibalism) Some have bells on the tips of the toes and I also added some vintage silver garland for a bit of sparkle.


