


Books let us into their souls and lay open to us the secrets of our own.
-William Hazlitt-
-William Hazlitt-

A couple of posts ago I shared a little pop up book with you from my early days in playing with paper. There was an expressed interest in learning to make the book so I have prepared a little tutorial for those of you who might be interested in making your own. Please note that in this tutorial I only give the mechanics of making the book and leave the decorating part strictly up to you.
This would be a great project to make with your children or grandchildren or imagine the delight of any little one who received a pop up book with themselves featured. Or, you can get really artful with this little volume making themed books, pop up your favorite inspiring quotes, or maybe just favorite mini snap shots of friends and family, you are only limited by your imagination. Have fun!
MATERIALS:
*Light weight card stock
*Paper to match card stock
*Scissor
*Glues - Glue stick, spray glue, or matte super heavy gel or matte gel medium
*Ruler
*Pencil
*Bone folder
*Brayer
*Ribbon
*Mini clothes pins or paper clips
*Card stock scraps
*Misc. ephemera, photos, paper scraps, lace, stickers, etc. (any type of flat embellishments you desire)
INSTRUCTIONS:
PREPARING THE BOOK PAGES:
 *Cut 4 six inch squares of lightweight card stock.
*Cut 4 six squares of matching paper or ephemera.
TIP: Test the pliability of your paper if you choose to use vintage ephemera, sometimes it is too dry and brittle and will crack or tear when folding weakening the spine of your book. In this case I advise using a copy of your vintage piece.
*Using spray glue, glue card stock and your choice of paper together, back to back, bray to secure glue.
FOLDING AND ASSEMBLING THE BOOK:
*Assemble your book pages, cover side facing down.
 *Fold each page in half, folding the bottom of the page to meet the top matching the top and bottom edges then crease with a bone folder.
 TIP: If you want to do any inking on the edges of the inside or outside of the book or rubber stamping, you might want to do this before you start to fold, it just makes it easier. Allow ink to dry then begin folding.
*Unfold your pages and then fold each page right to left matching up the outside edges then creasing with the bone folder. *Open your pages back up. Using a scissor, cut on the bottom crease up to the center of the book page.
 *Brush matte gel medium onto one cut section, overlap other cut section, gluing in place, bray to secure glue. Repeat for each book section and allow to dry.

 *Once dry, turn each section so that the glued together flaps in the step above are positioned on the inside cross section.
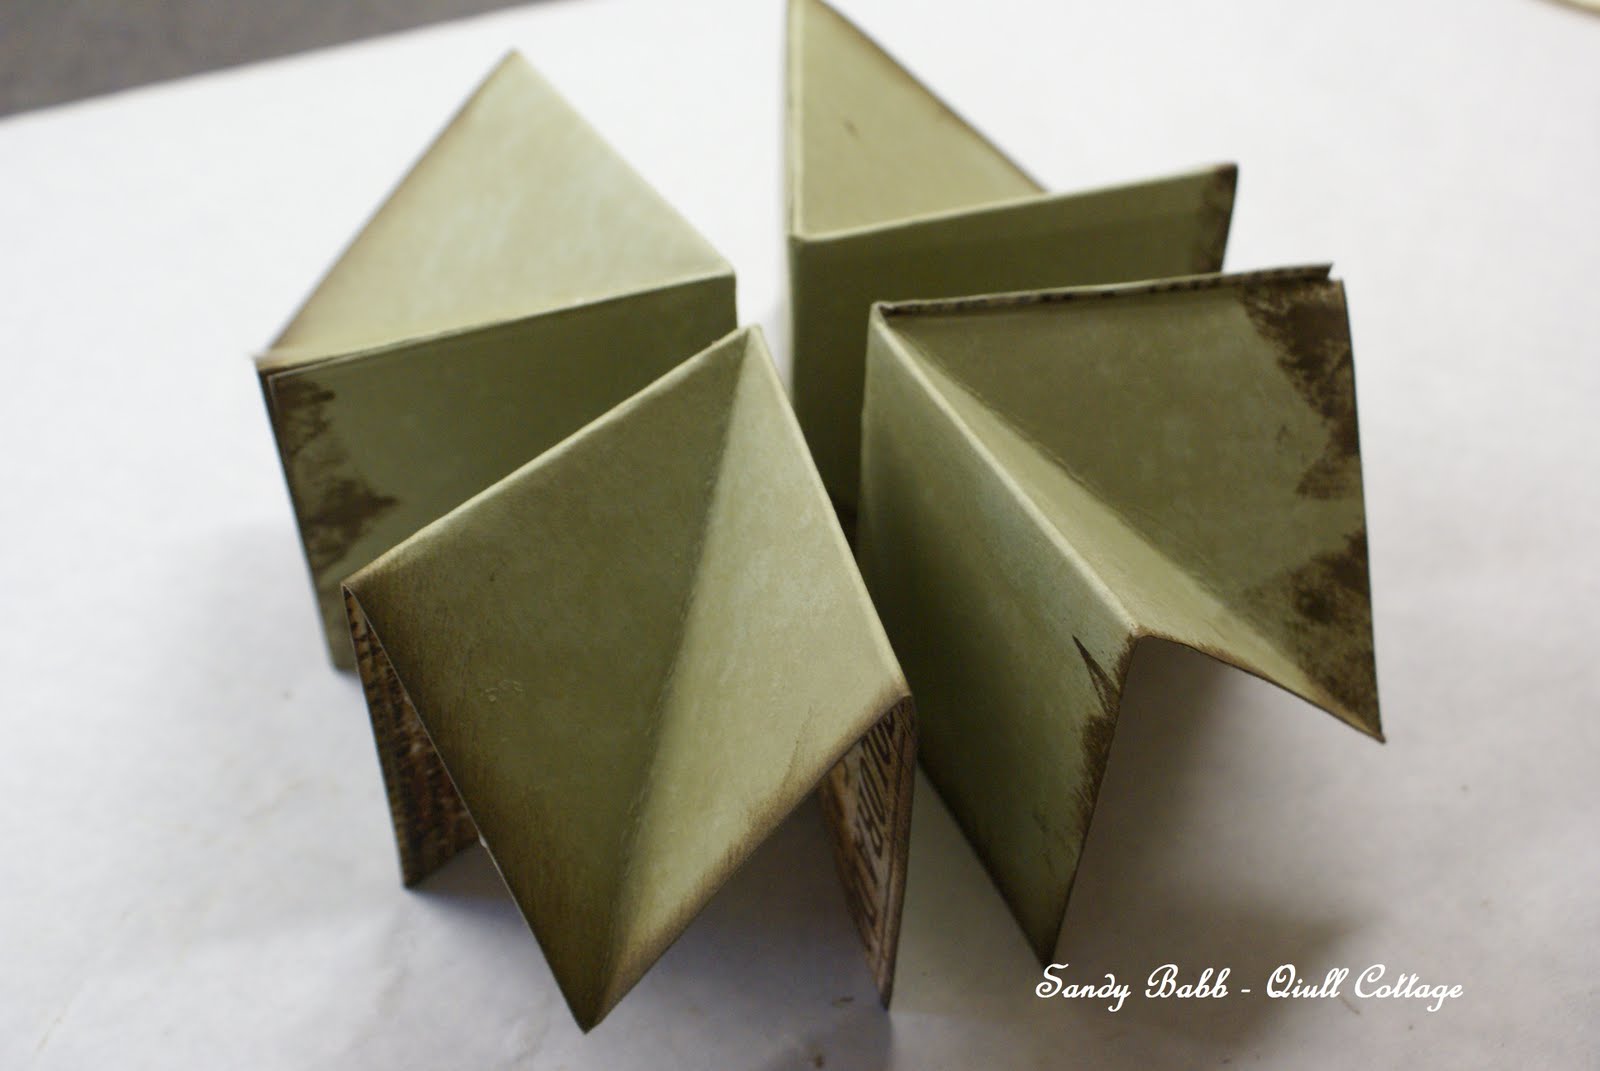
 *Take each pop up section and turn it upside down.
 Gently push the loose tip toward the inside center, matching up the two outside edges, crease to hold shape, repeat for each section. You want to make sure you are only folding one thickness of card stock on the bottom or your book won't work properly.


 *Turn the sections back over and line the up just as you see in the photo below.
 *Take a section and brush matte gel medium onto one side, matching all the edges, press together with another section, smoothing well with your finger tips to secure glue.

 *Repeat process two more times to connect all the sections, leaving one side open, this will be the front and back cover of your book. Set aside to dry. You might want to secure your glued areas with mini clothes pins or paper clips to hold in place until it is dry.
 *Once dry book is dry, cut a front and back cover the size of your book, decorate.
  Flip covers over and secure ribbon ends with glue placing in the center of the book.
 *Glue decorated covers to open section of book.
POP UP MECHANISM:
 *Open your pages back up. Using a scissor, cut on the bottom crease up to the center of the book page.
 *Brush matte gel medium onto one cut section, overlap other cut section, gluing in place, bray to secure glue. Repeat for each book section and allow to dry.

 *Once dry, turn each section so that the glued together flaps in the step above are positioned on the inside cross section.
 *Take each pop up section and turn it upside down.
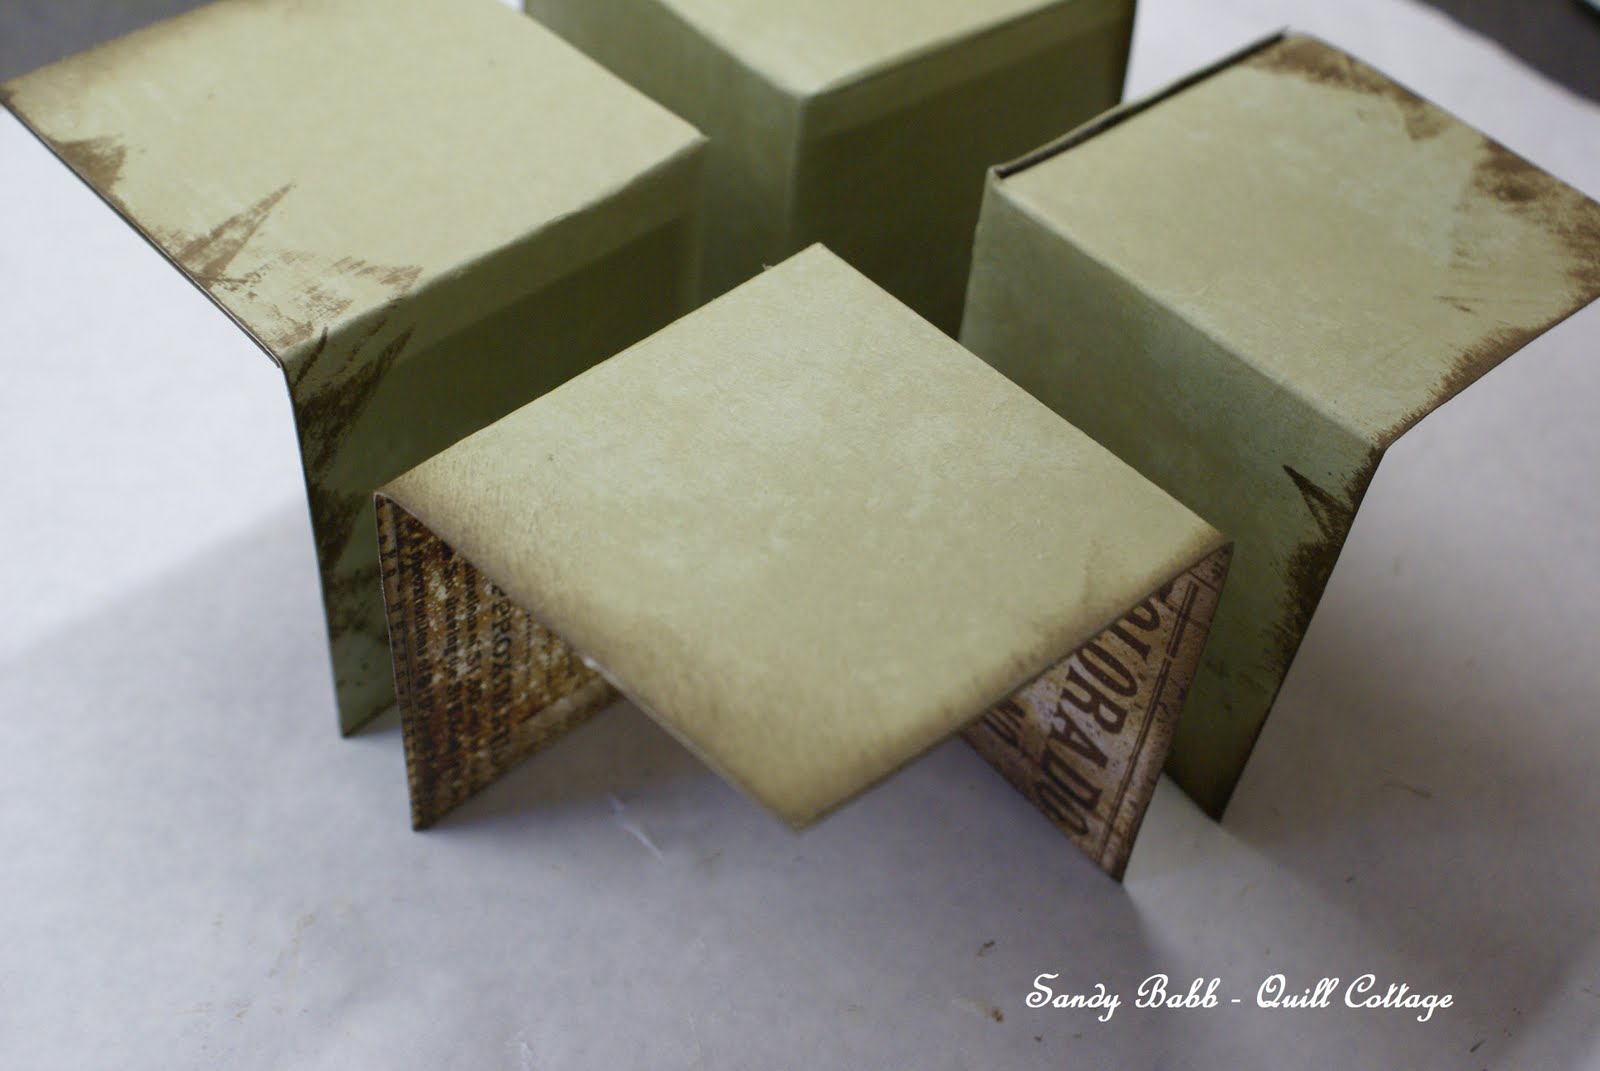 Gently push the loose tip toward the inside center, matching up the two outside edges, crease to hold shape, repeat for each section. You want to make sure you are only folding one thickness of card stock on the bottom or your book won't work properly.


 *Turn the sections back over and line the up just as you see in the photo below.
 *Take a section and brush matte gel medium onto one side, matching all the edges, press together with another section, smoothing well with your finger tips to secure glue.

 *Repeat process two more times to connect all the sections, leaving one side open, this will be the front and back cover of your book. Set aside to dry. You might want to secure your glued areas with mini clothes pins or paper clips to hold in place until it is dry.
 *Once dry book is dry, cut a front and back cover the size of your book, decorate.
  Flip covers over and secure ribbon ends with glue placing in the center of the book.
 *Glue decorated covers to open section of book.
POP UP MECHANISM:
*Cut 4 - 1 inch by 2 inch pieces of scrap card stock that coordinate with your papers.
 *Fold in half, matching 1 inch sides, and crease.
 *On the crease, measure in and mark 1/4 inch from each side. Measure up and mark 1/2 inch as shown in photo below.
 *Using a scissor, clip on pencil marks.
 *Open up with crease facing up, gently pull the cut section forward, matching one inch ends, creasing. Repeat for each mechanism.

 *Secure a single pop up mechanism to each section of your book with glue, making sure it does not go over the fold as shown below.
 *Choose an image, sticker, etc. to secure to the flat front of the mechanism with glue.
 NOTE: Test fit your pop up with the book both open and closed to be sure it is not too large or it will hang outside of your book. Also, if you want the ends of the mechanism hidden, cover them with snips of paper to match your background glued over the ends before you attach the image.
FINISHING THE BOOK:
*Decorate the inside of your book using flat ephemera, stickers, etc. nothing that gets really bulky and allow to dry.
Enjoy!
Blessings,
Miss Sandy
EDIT ADDED: If you would like a free PDF file of this tutorial for easy access please email me at srpbabb@gmail.com
Miss Sandy
EDIT ADDED: If you would like a free PDF file of this tutorial for easy access please email me at srpbabb@gmail.com
22 comments:
Thank you Sandy for such a beautiful and detailed tutorial. I'm going to give this a try. What a great great gift these little books would be.
Thanks Again..... Ruth ;)
Wat heb je dat leuk gedaan !!!
Apart hoor.
Gr Yvonne
Thank you, Miss Sandi! I can hardly wait to try my hand at this! But you make things looks soo easy and have such a gift for creating! I hope mine turns out even half as sweet!
Blessings!
What a great tutorial! Thanks for sharing with us!
Sandy xox
Oh, thank you! I had wondered at your original post, but for some reason, I felt it too bold a request, so I didn't. Thank you, those who did! It is positively wonderful! I know it's a lot of work to produce a tutorial . . . your's is well wrought, and very clear.
I'm so sorry . . . I can't stay . . . I have work to do! I'm all a-twitter! I can't wait to get busy!
Thank you so very much!
~Debbi
Your book is wonderful and so creative thank you for sharing...
I was hoping you'd share the book how-to! Your tutorial couldn't be more clear. A+ for excellent teaching! - Amy Bauer
I was hoping you'd share the book how-to! Your tutorial couldn't be more clear. A+ for excellent teaching! - Amy Bauer
By far one of the best tutorials I've seen. I have bookmarked this to my home bar and as soon as I can I will come back to learn!
You did a fabulous Job!
and thank you for your kind words today
Suzan
Sandy you really do the best tutorials. You make me think I could even do this.
Your days at the farm make me miss our farm so much. We sold the farm about 20 years ago. What a wonderful place to raise our children. And even though I did not enjoy dairying,I loved everything else about it. We still live in the country, but are on only a little more than an acre now. I adore the picture of the cattle 'comin' home' All the photos are just superb!!!
Thank you for your congratulations on the studio win. I am still in denial that I could have won, with all the amazing studios that joined in the fun. But grateful indeed.
hugs
Bless you Sandy for making us dream so big!! I would love to make this fun book you are showing and use each of the four seasons in the little rooms...I will let you see it once the dream becomes real....
Karla in the cozy cottage
Just taking a quick peek tonight, but I'll be back to have a closer look. At first glance, I think it's way beyond my capabilities. Way! :D
Oh my yes! When I saw your pop-up, I was saying to myslef how much I wished you'd have shown how you did it - it sooo cool! Thank you for sharing this with us!
colleen_blake@comcast.net
Hi Sandy,
What a great tutorial, I'm lookig forward to having a go, you make it look so dooable, ( is that a real word?)
I think it would make a lovely present for my Grandaughter for Christmas.
Have a great weekend,
Smiles,
Angela.
Ok, now don't laugh, Sandy, but when I first saw the folded shapes, it reminded me of the "cootie catchers" we used to make in grade school. ;-)
Oh, remember those days! We'd write fortunes inside them. The boys were always the ones who had to pretend to catch cooties. LOL! We girls enjoyed the fortunes at lunch time.
I love the paper you used for your book! Thank you for the instructions and the chance walk down grade school memory lane!
Hugs,
Diane
Oh this is wonderful- can't wait to try it- your instructions and pictures are so thorough- and I know that took a lot of time, thanks so much.
Thank you for this great tutorial.
I have been reading your blog for a couple years now. You have always been an inspiration for me. Well now I have finally joined in and I started my own blog.
I would love to have you come take a visit, if you have time.
Thank you,
Marianne
This is so cool! Thanks for the tutorial, I am going to make a couple Christmas cards with this in November!
This is the perfect idea i needed for an altered art journal i am working on. the theme is 'cabinets of curiosities and it couldn't be better. i am so blessed to have 'found' you. have a beautiful day !
jill
jillsibbald.typepad.com
Wow, this is absolutely exquisite!! I just found your blog from Mary's Green Paper blog, and I'm so happy I did. Your project using her images was also gorgeous. So much inspiration here! Thanks so much for the tutorial... will be emailing for the pdf, thanks!
thank you for this tutorial ! the papers you chose are wonderful, I will try and do the same, but with my own book pages. Will let you know when I find the time to do it !!
thanks again !!!
WOW! What an insanely wonderful tutorial!
Helen -- Firenze Cards
Post a Comment