


"To find the universal elements enough; to find the air and the water exhilarating; to be refreshed by a morning walk or an evening saunter; to be thrilled by the stars at night; to be elated over a bird's nest or a wildflower in spring~these are."
~John Burroughs~

(Click on any photo to enlarge for better viewing)
I finished up the Nest Assemblage from my last post and thought I would share the results with you. I added a piece of glass to the front so it made it really hard to get a clear photo without the glare. I cut a piece of glass the exact size of the outer measurement of the drawer opening and covered all the edges in copper foil tape, burnishing it down with a bone folder. I ran a bead of clear drying glue around the edge of the drawer and placed the glass on top, weighting it until it was dry.
 I used a old rusty handle, brass corners, a tin heart, and some old brass tacks to further embellish the assemblage. I sprayed the brass corners and tin heart with some Hammered Copper spray paint (RUST-OLEUM brand). After the brass corners were dry I used a E6000 to adhere them to each front corner.
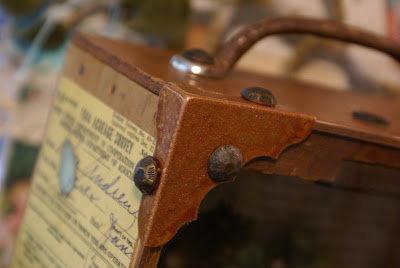 I could not nail them on because the drawer sides are very thin, even tiny nails would go through. To cover all the holes where the nails should have gone I snipped off the back of some old upholstery tacks, gluing them in place with E6000 also. I was able to nail the handle on with the tacks.
 The tin heart was embellished with a bit of the left over Queen Anne's Lace print and a few sentences from a copy of an old book page.
 All done and ready to hang!
 I thought you might enjoy learning how to make a simple fiber nest for use in your artwork too.
 MATERIALS:
 I cut a piece of glass the exact size of the outer measurement of the drawer opening and covered all the edges in copper foil tape, burnishing it down with a bone folder. I ran a bead of clear drying glue around the edge of the drawer and placed the glass on top, weighting it until it was dry.
 I used a old rusty handle, brass corners, a tin heart, and some old brass tacks to further embellish the assemblage. I sprayed the brass corners and tin heart with some Hammered Copper spray paint (RUST-OLEUM brand). After the brass corners were dry I used a E6000 to adhere them to each front corner.
 I could not nail them on because the drawer sides are very thin, even tiny nails would go through. To cover all the holes where the nails should have gone I snipped off the back of some old upholstery tacks, gluing them in place with E6000 also. I was able to nail the handle on with the tacks.
 The tin heart was embellished with a bit of the left over Queen Anne's Lace print and a few sentences from a copy of an old book page.
 All done and ready to hang!
 I thought you might enjoy learning how to make a simple fiber nest for use in your artwork too.
 MATERIALS:
*Wire, brass (24 gauge), copper(26 gauge), and burgundy(20 gauge)
 *Wire Cutters
*Scissor
*Yard Stick or Measuring Tape
*Various Fibers of your choice, suggestions are: yarn, thread, embroidery floss, shredded paper, jute, twine, raffia, etc.

INSTRUCTIONS:
* Cut 3, 30 inch pieces of yarn.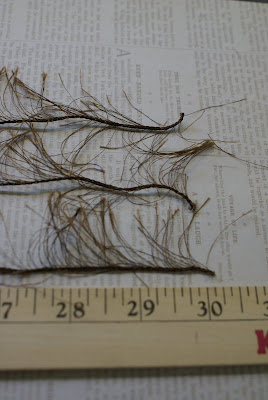 *Cut 2, 30 inch pieces of yarn in a different texture than the first three.
 *Cut 3, 10 inch piece of three ply jute rope.
 *Unravel each of the pieces of jute and separate the ply.

 *Cut 7, 30 inch pieces of various threads.
 *Cut 1, 30 inch piece of embroidery floss.
 *Take 2 stands of raffia and pull them apart making several thin pieces.
 *Layer all your fibers, mixing the materials until you have them all laid out stacked together; add your 30 inch wires to the stack.
 *Cut a 20 inch piece of copper wire gather one end of your stacked fiber and wire mix and wrap the end with the 20 inch piece of wire to secure the end together.
 *Lay three of your unraveled jute stings below where you just wired.
 *Layer in bits of shredded paper, sheet music, tissue paper, Spanish moss, or gift basket filler, you only need a few pieces.
 *Wrap the copper wire around the stacked materials making sure you do not bind it too tightly, continue wrapping and adding jute and paper bits until you reach the opposite end of the strand.

 You will need to add more copper wire as you go, simply twist it to the previous wire and keep wrapping.
 Once you reach the end, tightly wrap the wire to secure.
 *Cut a 20 inch piece of copper wire and secure it to the end of your wrapped bundle. Twist the end into a tight circle.
  Wrap the loose wire around the outside of the circle bringing the end up through the center of the circle, pulling tight.
 *Continue to wrap in a flat circle, securing with wire, until you approximately a 1 1/2 inch base.
 *Begin to build up the sides of the nest by layering the bundle onto the flat base, using the wire to secure by pulling it through only the previous layer. Continue to shape, mold, wrap, and wire until you have formed a nest. If you run out of wire before finishing, just cut another piece and twist it together with the one ending and keep securing.
 *Once your nest is complete it will more than likely need a trim.
 *Cut 2, 30 inch pieces of yarn in a different texture than the first three.
 *Cut 3, 10 inch piece of three ply jute rope.
 *Unravel each of the pieces of jute and separate the ply.

 *Cut 7, 30 inch pieces of various threads.
 *Cut 1, 30 inch piece of embroidery floss.
 *Take 2 stands of raffia and pull them apart making several thin pieces.
 *Layer all your fibers, mixing the materials until you have them all laid out stacked together; add your 30 inch wires to the stack.
 *Cut a 20 inch piece of copper wire gather one end of your stacked fiber and wire mix and wrap the end with the 20 inch piece of wire to secure the end together.
 *Lay three of your unraveled jute stings below where you just wired.
 *Layer in bits of shredded paper, sheet music, tissue paper, Spanish moss, or gift basket filler, you only need a few pieces.
 *Wrap the copper wire around the stacked materials making sure you do not bind it too tightly, continue wrapping and adding jute and paper bits until you reach the opposite end of the strand.

 You will need to add more copper wire as you go, simply twist it to the previous wire and keep wrapping.
 Once you reach the end, tightly wrap the wire to secure.
 *Cut a 20 inch piece of copper wire and secure it to the end of your wrapped bundle. Twist the end into a tight circle.
  Wrap the loose wire around the outside of the circle bringing the end up through the center of the circle, pulling tight.
 *Continue to wrap in a flat circle, securing with wire, until you approximately a 1 1/2 inch base.
 *Begin to build up the sides of the nest by layering the bundle onto the flat base, using the wire to secure by pulling it through only the previous layer. Continue to shape, mold, wrap, and wire until you have formed a nest. If you run out of wire before finishing, just cut another piece and twist it together with the one ending and keep securing.
 *Once your nest is complete it will more than likely need a trim.
(Nest Top) (Nest Bottom)
  Trim away any excess fiber but be sure to leave it natural looking with some little snips sticking out, after all, it is supposed to look like a bird built it!
 Add and egg, display, and enjoy!
 (Nest Bottom)
  Trim away any excess fiber but be sure to leave it natural looking with some little snips sticking out, after all, it is supposed to look like a bird built it!
 Add and egg, display, and enjoy!
Blessings,
Miss Sandy
P.S. This tutorial as well as others featured on my blog has been added to my tutorial link on my side bar. I have recently added sites that provide free graphics for use in your artwork. To check them out just click on the little birds nest photo on my side bar listed under Quill Cottage Tutorials, Tips, and Techniques. Enjoy!
P.S. This tutorial as well as others featured on my blog has been added to my tutorial link on my side bar. I have recently added sites that provide free graphics for use in your artwork. To check them out just click on the little birds nest photo on my side bar listed under Quill Cottage Tutorials, Tips, and Techniques. Enjoy!


